
Baked Crunchy Honey Chicken

Crispy, oven-baked chicken bites glazed in a sweet-savory honey soy sauce—an easy weeknight favorite that stays crunchy without deep-frying.
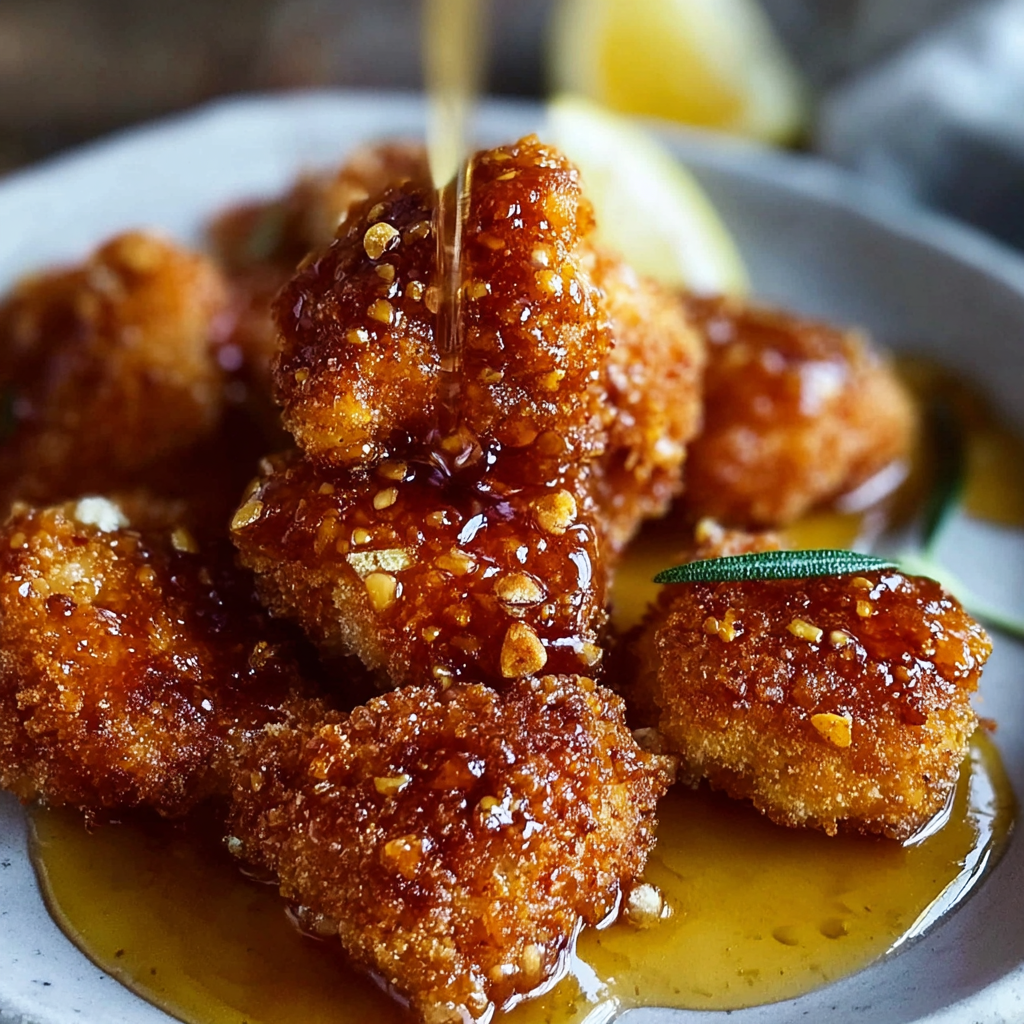
This Baked Crunchy Honey Chicken became a weeknight savior the first time I made it for a hungry crowd after a long weekend of outdoor activities. I discovered the coating-to-glaze balance one rainy afternoon when I wanted takeout textures without the grease. The result was golden, crisp pieces of boneless, skinless chicken thighs with a glossy honey-soy finish that my family insisted I write down. The contrast between the crunchy panko exterior and the warm, sticky glaze is what makes this preparation truly memorable: each bite delivers snap, tenderness, and that hit of sweet-salty comfort that keeps everyone reaching for more.
I usually choose boneless, skinless thighs for this dish because they stay juicy under high heat and are forgiving if you slightly overbake them. I first paired this method with a jar of local wildflower honey and an everyday bottle of Kikkoman soy sauce; that combination produced deep flavor with minimal fuss. This version keeps technique at the center—three-step breading, a light spray of oil so the exterior crisps in the oven, and a short final glaze bake so the honey sets without burning. It’s perfect for busy nights, potlucks, and casual gatherings where you want comfort-food appeal without hours of work.
Why You'll Love This Recipe
- Crunchy oven finish: Uses panko breadcrumbs and a light oil spray for deep crispness without frying, saving time and avoiding extra oil.
- Quick hands-on time: Active prep is under 20 minutes and most of the time is hands-off baking—ready in about 35 minutes total.
- Pantry-friendly ingredients: All-purpose flour, eggs, panko, honey, and soy sauce are likely already in the kitchen.
- Family-pleasing flavor: The sweet-savory honey glaze pairs beautifully with the seasoned crust for broad crowd appeal.
- Make-ahead friendly: Baked pieces keep well and can be reheated or frozen for meal prep; glaze can be prepared ahead too.
- Customizable heat and sweetness: Adjust honey or soy ratios, or add chili flakes for a spicy kick.
In my household this dish quickly earned a spot on repeat rotation — my partner likes that it holds up well for packed lunches, while my kids declared it a “crispy honey nugget” and requested it for birthday dinners. It’s one of those recipes where a few simple upgrades—using panko, a quick seasoned flour mix, and a warm honey glaze—make a humble chicken cut into something special.
Ingredients
- Chicken: 1 1/2 pounds boneless, skinless chicken thighs—choose evenly sized pieces for uniform cooking; thighs stay juicy compared to breasts and are forgiving if slightly overbaked.
- All-purpose flour: 1 cup (King Arthur or other reliable brand) mixed with seasonings to form the dry base that helps the egg adhere and creates a thin seasoned barrier under the breadcrumbs.
- Eggs: 2 large, beaten—act as the glue that helps breadcrumbs cling and build that crunchy exterior.
- Breadcrumbs (panko preferred): 1 cup panko for extra crunch; regular breadcrumbs will work but panko gives a flaky, light texture.
- Honey: 1/2 cup raw or runny honey—local wildflower or clover honey offers a nuanced sweetness that caramelizes nicely.
- Soy sauce: 2 tablespoons (Kikkoman or low-sodium alternative) for umami depth in the glaze.
- Dry seasonings: 1 teaspoon garlic powder, 1 teaspoon onion powder, 1 teaspoon paprika, 1/2 teaspoon salt, 1/2 teaspoon black pepper—these are folded into the flour to build flavor inside the crust.
- Cooking spray or oil: Light spray to encourage browning and crispiness on the baking sheet without deep-frying.
Instructions
Step 1 — Preheat and Prepare Baking Station: Preheat the oven to 400°F. Line a baking sheet with parchment paper or a silicone mat and set a metal cooling rack on the sheet if you have one; elevating the chicken helps hot air circulate and keeps the underside crisp. Arrange 3 shallow bowls for flour, eggs, and breadcrumbs for a smooth assembly line. Step 2 — Cut and Dry the Chicken: Rinse briefly under cold water if desired, then pat the chicken completely dry with paper towels. Trim excess fat and cut the thighs into bite-sized pieces—about 1 to 1 1/2 inches—so they cook evenly and get maximum crust-to-meat ratio. Step 3 — Seasoned Flour Mix: In the first bowl, combine 1 cup all-purpose flour with 1/2 teaspoon salt, 1/2 teaspoon black pepper, 1 teaspoon garlic powder, 1 teaspoon onion powder, and 1 teaspoon paprika. This seasoned flour not only flavors the interior of the crust but reduces moisture before the egg step for better adhesion. Step 4 — Breading Station and Coating: Beat 2 large eggs in the second bowl until smooth. Place 1 cup panko in the third bowl. Working one piece at a time, dredge in the flour mixture, shaking off excess, dip into the beaten eggs, then press into the panko until thoroughly coated. For an extra-thick crust, repeat the egg and panko step once more. Step 5 — Arrange and Bake: Place coated pieces on the prepared sheet or on the wire rack. Make sure pieces are spaced at least 1/2 inch apart. Lightly spray each piece with cooking spray to promote browning. Bake at 400°F for 20–25 minutes until golden and the crust feels firm when gently tapped. Step 6 — Make the Honey Glaze: While the chicken bakes, combine 1/2 cup honey and 2 tablespoons soy sauce in a small saucepan over low heat. Stir gently until the mixture warms, blends, and thins slightly—about 2–3 minutes. Keep it on the lowest heat to avoid caramelizing too quickly. Step 7 — Glaze and Finish Baking: Remove the chicken from the oven and brush or drizzle the warm glaze over each piece. Return to the oven for an additional 5–10 minutes so the glaze sets and develops a glossy finish. Watch closely near the end so the honey does not darken too much. Step 8 — Check Doneness and Rest: Confirm internal temperature reaches 165°F using an instant-read thermometer. Let the pieces rest for 3–5 minutes; this short rest firms the glaze and lets juices redistribute for a juicier bite.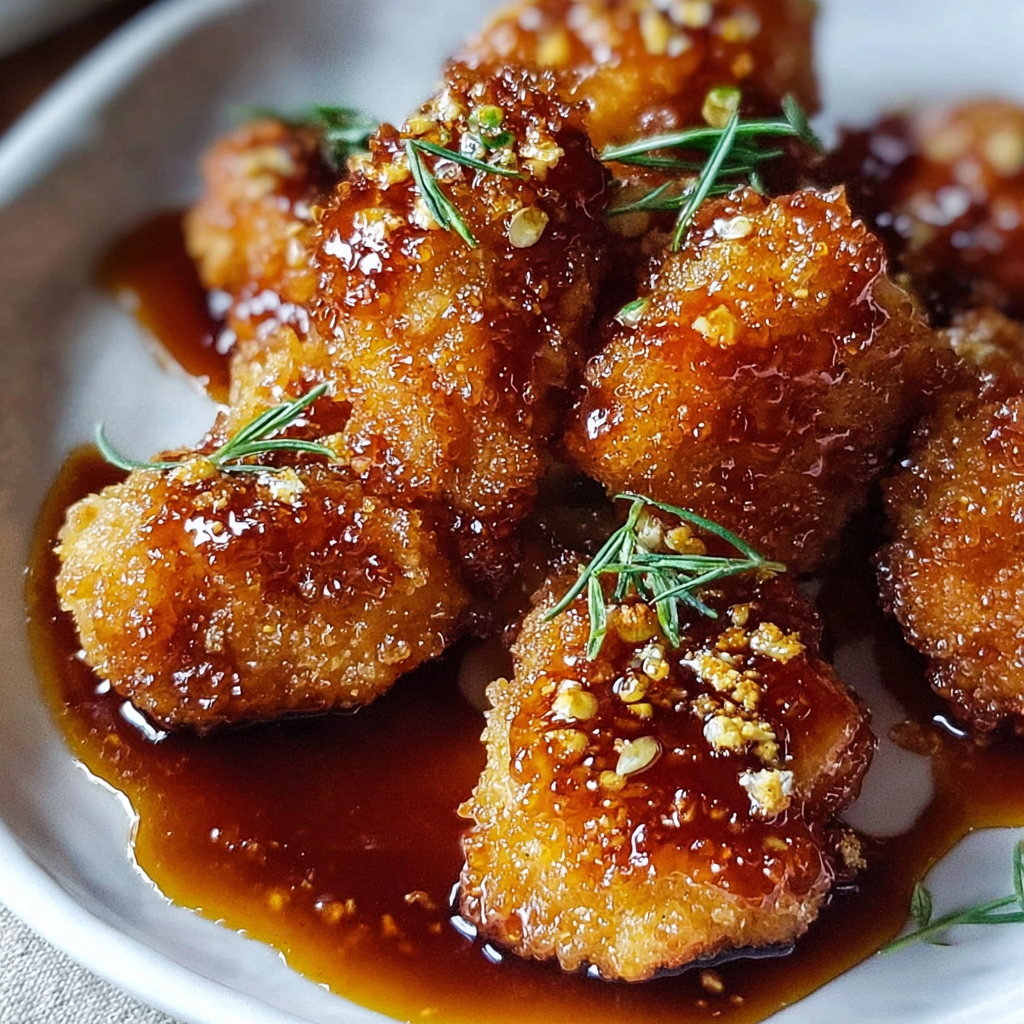
You Must Know
- This dish is high in protein and provides a hearty portion—pieces keep well in the fridge for 3–4 days and can be frozen for up to 3 months.
- If you’re watching sodium, use low-sodium soy sauce and reduce added salt in the flour mix; the glaze will still be flavorful.
- For crunch retention, reheat in a 375°F oven or air fryer rather than the microwave to avoid sogginess.
- Honey caramelizes quickly—use low heat for the glaze and watch closely during the final bake to prevent burning.
What I love most about this method is how forgiving it is: even when life gets messy, a quick breading and oven-finish gives consistently crisp results. The family memories tied to plates of sticky, crunchy chicken—late-night movie nights, potluck tables, or a makeshift picnic in the living room—are what keep me returning to this technique. It’s practical, satisfying, and always a crowd-pleaser.

Storage Tips
Store cooled pieces in an airtight container in the refrigerator for up to 4 days. To freeze, flash-freeze in a single layer on a baking sheet for 1–2 hours, then transfer to a freezer bag for up to 3 months; this prevents clumping. Reheat in a 375°F oven for 8–12 minutes or in an air fryer at 350°F for 5–8 minutes to restore crispness. Avoid reheating in the microwave if you want to keep the crust crunchy—microwaving will soften the panko coating.
Ingredient Substitutions
If you don’t have panko, regular breadcrumbs work but expect a denser crust—toss with a teaspoon of oil to improve browning. For wheat-free diets, use gluten-free flour and gluten-free panko alternatives, and opt for tamari in place of regular soy sauce. To reduce sugar, swap half the honey for a tablespoon of rice vinegar and a pinch of sweetener, though this will change the glaze texture. For leaner meat, boneless chicken breasts can be used, but reduce baking time slightly to avoid dryness.
Serving Suggestions
Serve over steamed rice or sticky jasmine rice to soak up glaze, alongside quick cucumber salad for freshness, or with roasted vegetables for a balanced plate. Garnish with thinly sliced green onions and sesame seeds for color and texture contrast. For a snack or party platter, pair with small bowls of extra glaze, spicy mayo, or ponzu for dipping.
Cultural Background
The sweet-and-salty pairing of honey and soy draws on East Asian flavor contrasts while the Western breadcrumb crust evokes comfort-fry traditions. This fusion approach is common in modern home cooking, where pantry staples meet global inspiration—transforming simple ingredients into a hybrid dish that feels familiar and new at the same time.
Seasonal Adaptations
In spring and summer, incorporate fresh herbs like chopped cilantro or basil into a citrusy glaze for brightness. During fall and winter, a touch of grated ginger or a pinch of ground cinnamon in the glaze adds warmth. Swap honey for maple syrup in autumn for an earthier sweetness that pairs well with roasted root vegetables.
Meal Prep Tips
Double the batch and freeze half for quick lunches. Store glazed and unglazed pieces separately—reheat the chicken and brush with warmed glaze just before serving to keep texture optimal. Use shallow, compartmentalized containers to prevent crushed crusts and pack with a small container of extra glaze for reheating or dipping at work.
Making this at home brings the joy of crunchy textures and sticky-sweet glaze without the mess of frying—perfect for sharing, meal prepping, or simply satisfying a craving for comfort food. Give it a try this week and tweak levels of sweetness, salt, and heat to make it your own.
Pro Tips
Pat chicken completely dry before breading to improve adhesion and crunch.
Use panko breadcrumbs and a light oil spray on top to mimic deep-fried crispness in the oven.
Finish under low heat when glazing so the honey sets without burning.
Elevate the pieces on a wire rack for more even browning on all sides.
This nourishing baked crunchy honey chicken recipe is sure to be a staple in your kitchen. Enjoy every moist, high protein slice — it is perfect for breakfast or as a wholesome snack any time.
FAQs about Recipes
How long does leftover chicken last?
Yes. The chicken can be stored in an airtight container in the refrigerator for 3–4 days and frozen for up to 3 months. Reheat in the oven or air fryer to retain crispness.
Can I make this gluten-free?
Use gluten-free all-purpose flour and gluten-free panko replacement; swap soy sauce for tamari if needed.
Tags
Baked Crunchy Honey Chicken
This Baked Crunchy Honey Chicken recipe makes perfectly juicy, tender, and flavorful steak every time! Serve with potatoes and a side salad for an unforgettable dinner in under 30 minutes.
Ingredients
Chicken
Breading
Glaze
Seasonings
Instructions
Preheat and Prepare
Preheat oven to 400°F. Line a baking sheet with parchment paper or a silicone mat and place a wire rack on top if using. Arrange three shallow bowls for the dry flour mixture, beaten eggs, and panko.
Prepare Chicken
Pat chicken thighs completely dry with paper towels and cut into 1 to 1 1/2 inch bite-sized pieces for even cooking and uniform coating.
Make Seasoned Flour
In a bowl combine 1 cup flour with 1/2 teaspoon salt, 1/2 teaspoon pepper, 1 teaspoon garlic powder, 1 teaspoon onion powder, and 1 teaspoon paprika. Mix thoroughly to distribute seasonings.
Breading Process
Dredge each piece in the seasoned flour, shake off excess, dip into beaten eggs, then press into panko breadcrumbs until evenly coated. For a thicker crust, repeat the egg and panko step.
Arrange and Bake
Place coated pieces on the prepared sheet or rack, spaced 1/2 inch apart. Lightly spray with cooking oil and bake at 400°F for 20–25 minutes until golden and firm.
Prepare Honey Glaze
Combine 1/2 cup honey and 2 tablespoons soy sauce in a small saucepan over low heat and warm gently until blended, about 2–3 minutes. Keep heat low to avoid burning the honey.
Glaze and Finish
Remove the chicken from the oven, brush or drizzle the glaze over each piece, and return to the oven for 5–10 minutes so the glaze sets and becomes glossy. Watch closely to avoid over-browning.
Check Temperature and Rest
Use an instant-read thermometer to ensure the internal temperature reaches 165°F. Let pieces rest for 3–5 minutes to allow juices to redistribute and the glaze to firm up.
Serve
Serve warm over rice, alongside a fresh salad, or as a snack with extra glaze on the side. Garnish with sliced green onions and sesame seeds if desired.
Last Step: Please leave a rating and comment letting us know how you liked this recipe! This helps our business to thrive and continue providing free, high-quality recipes for you.
Nutrition
Did You Make This?
Leave a comment & rating below or tag
@snapyrecipe on social media!
Categories:
You might also like...

5-Minute Thanksgiving Appetizers That Wow Every Guest
A fast, elegant bite for Thanksgiving: creamy cheese, bright cranberry, crunchy pecans and rosemary on crackers or baguette — ready in five minutes and loved by all.

Air Fryer Bang Bang Chicken Skewers
Crispy air-fried chicken skewers tossed in a creamy, sweet-spicy bang bang sauce — a quick, crowd-pleasing weeknight favorite.

Air Fryer Honey Butter Garlic Chicken Tenders
Crispy air-fried chicken tenders coated in a sticky honey-butter garlic glaze — quick, family-friendly, and ready in about 25 minutes.
Did You Make This?
Leave a comment & rating below or tag @snapyrecipe on social media!
Rate This Recipe
Share This Recipe
Enjoyed this recipe? Share it with friends and family, and don't forget to leave a review!
Comments (1)
This recipe looks amazing! Can't wait to try it.
Comments are stored locally in your browser. Server comments are displayed alongside your local comments.
Hi, I'm Natalia!
What's Popular

Get My 30-Minute Meals email series!
Quick and easy dinner ideas delivered to your inbox.