
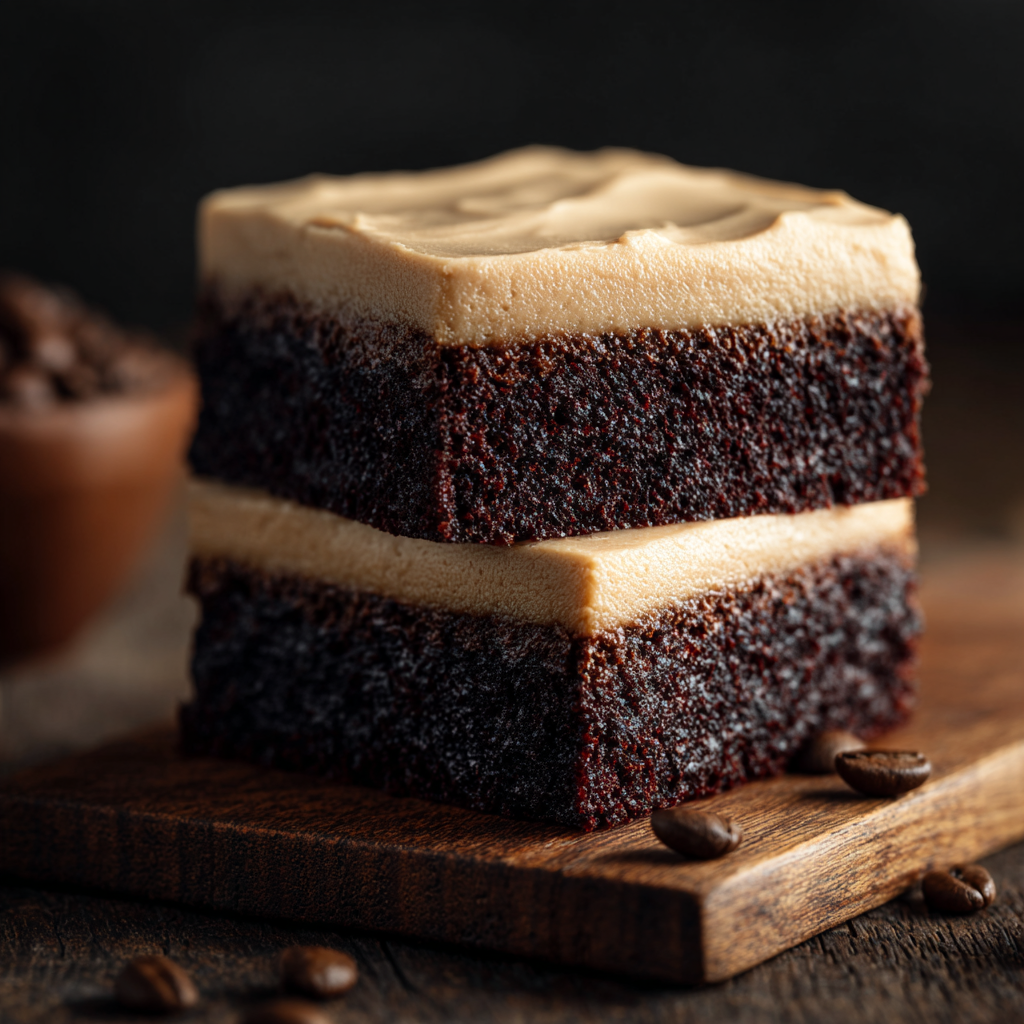
Frosted Coffee Brownies

Fudgy chocolate brownies brightened with coffee and finished with a silky espresso frosting—an irresistible cross between a classic treat and a caffeine kick.
This pan of frosted coffee brownies began as an experiment on a rainy Sunday when I wanted chocolate but also craved the lift coffee gives on slow afternoons. I discovered the balance between strong brewed coffee and instant espresso powder while testing different formulations: too much coffee flattened the chocolate, too little left the espresso note shy. The final version landed somewhere in the middle, delivering rich, fudgy crumbs and a pronounced but harmonious coffee edge that made everyone ask for the recipe.
I first shared these at a neighborhood potluck, and they disappeared faster than my last batch of chocolate chip cookies. What makes them special is the contrast of textures—the slightly crackled top and dense interior paired with a satiny espresso frosting that cools to a tender crust but stays creamy under the tooth. The batter is forgiving, the frosting simple, and the coffee transforms the chocolate into something almost mocha-like without overpowering it.
Why You'll Love This Recipe
- Fudgy center with a crackly top: the melted-butter method yields a dense, glossy interior and a thin, delicate crust you break with the back of a fork.
- Fast and accessible: ready in about an hour from start to finish, using pantry staples like cocoa, instant espresso, and regular instant coffee.
- Make-ahead friendly: you can bake ahead and frost the next day for cleaner slices; the flavor develops overnight in the fridge.
- Crowd-pleaser with caffeine: the espresso frosting elevates the brownies for coffee lovers without being a dessert-only option—perfect with breakfast coffee or after-dinner espresso.
- Customizable: add mini chocolate chips for molten pockets or swap in dark chocolate chunks for a more intense bite; great for gifting in a lined box.
- Simple technique: a single-bowl approach for the batter keeps cleanup minimal and is approachable for bakers of any skill level.
When I make these for family gatherings, the ritual is the same: the tray comes hot from the oven and I let my partner do the first test slice—if they close their eyes and smile, I know it's a winner. One cousin always requests an extra dusting of espresso powder, while the neighbor loves them with a scoop of vanilla ice cream. These brownies have a way of starting conversations at any table.
Ingredients
- Unsalted butter: Use 1 cup (2 sticks) melted and slightly cooled for the batter and 1/2 cup (1 stick) softened for the frosting. Real butter brings richness and helps create the glossy, fudgy crumb; avoid margarine for best texture.
- Granulated sugar and powdered sugar: 2 cups granulated sugar in the batter for structure and tenderness; 3 cups sifted powdered sugar for a silky frosting—sifting prevents lumps and ensures a smooth finish.
- Eggs: Four large eggs at room temperature. Room-temp eggs emulsify more easily with melted butter, giving the batter a glossy, stable texture and contributing to lift without becoming cakey.
- Cocoa powder: 1/3 cup unsweetened cocoa powder—use Dutch-process for deeper chocolate notes or natural cocoa for a brighter, tangier finish. Sift to remove clumps.
- Coffee and instant espresso: 1/4 cup strong brewed coffee (cooled) in the batter plus 1 tablespoon instant espresso powder to intensify the mocha profile; frosting uses 3 tablespoons brewed coffee and 1 tablespoon instant espresso for an extra pop.
- Vanilla and salt: 1 teaspoon vanilla extract and 1 teaspoon salt to round flavors and enhance chocolate depth—use fine sea salt for even distribution.
- Flour: 1 cup all-purpose flour, measured by spooning into the cup and leveling for accuracy. Too much flour yields cakier results; keep measurements exact for the desired fudgy texture.
- Mini chocolate chips (optional): 1/2 cup folded into the batter for pockets of melted chocolate—brand doesn't matter, but semi-sweet chips balance the sweet frosting well.
- Heavy cream (for frosting): 2 tablespoons to adjust frosting consistency; if you prefer a dairy-free finish, substitute a neutral plant-based cream, keeping in mind flavor will shift slightly.
- Optional garnish: chocolate shavings or a dusting of extra espresso powder to finish; use a microplane for delicate shavings.
Instructions
Preheat and prepare the pan: Preheat the oven to 350°F. Line a 9x13-inch baking pan with parchment paper, leaving at least a 1-inch overhang on two sides for easy removal. Lightly butter the parchment to prevent sticking and ensure a clean lift when the slab is cool. Melt butter and mix with sugar: Melt 1 cup (2 sticks) unsalted butter in a small saucepan over low heat until fully liquid, then remove from heat and stir in 2 cups granulated sugar until it’s mostly dissolved and glossy. Allow the mixture to cool 2–3 minutes so the eggs won’t scramble when added. Add eggs and flavor: Whisk in four large room-temperature eggs one at a time, beating well after each addition until the mixture is glossy and slightly thickened. Stir in 1 teaspoon vanilla extract and 1 teaspoon salt to balance sweetness and build structure. Incorporate cocoa and coffee: Sift 1/3 cup unsweetened cocoa powder over the batter and fold gently to combine. Add 1/4 cup cooled strong brewed coffee and 1 tablespoon instant espresso powder, folding until streaks disappear; the coffee will bloom the cocoa, intensifying the chocolate flavor. Fold in flour and chips: Gently fold 1 cup all-purpose flour into the batter until just combined—avoid overmixing to prevent developing gluten, which would create a cakier texture. Stir in 1/2 cup mini chocolate chips if using for gooey pockets. Bake: Pour the batter into the prepared pan and smooth the top with a spatula. Bake in the preheated 350°F oven for 30–35 minutes. Begin checking at 28 minutes: a toothpick inserted near the center should come out with moist crumbs for a fudgy interior; it will not be completely clean. Cool and unmold: Cool the pan on a wire rack for at least 1 hour. Use the parchment overhang to lift the brownie slab from the pan; cooling prevents the frosting from sliding and makes slicing cleaner. Prepare the frosting: Beat 1/2 cup (1 stick) softened unsalted butter until smooth. Gradually add 3 cups sifted powdered sugar, alternating with 3 tablespoons cooled strong brewed coffee, then beat in 1 tablespoon instant espresso powder, 2 tablespoons heavy cream, 1 teaspoon vanilla extract, and a pinch of salt until silky. Adjust cream to reach spreadable consistency. Frost and garnish: Spread the frosting evenly over completely cooled brownies with an offset spatula. Garnish with chocolate shavings or a light dusting of espresso powder. Chill briefly to set, then slice into 16 squares using a sharp knife warmed under hot water and dried between cuts for tidy edges.
You Must Know
- These keep well: refrigerate in an airtight container up to 4 days; freeze unfrosted squares for up to 3 months and thaw in the fridge before frosting.
- Texture cues: underbaking slightly gives a fudgier center—target moist crumbs on a toothpick test rather than a clean pick.
- Flavor development: brownies taste even better the next day as coffee notes meld with chocolate.
- Nutritional note: each square is rich in calories and fat; serve small portions or pair with a fruit salad for balance.
My favorite part is the frosting: it transforms ordinary brownies into something you can serve at a celebration. I love watching guests’ faces when they get that first espresso hit—there’s always a little pause, then a delighted smile. These have become my go-to when I want an elevated but approachable dessert.
Storage Tips
Store cooled, frosted brownies in an airtight container in the refrigerator for up to four days; bring to room temperature for 20–30 minutes before serving to soften the frosting. For longer storage, freeze unfrosted, tightly wrapped slabs for up to three months; thaw overnight in the refrigerator, then frost the next day. Use parchment or wax paper between layers to avoid sticking. If you prefer a softer crust, leave the tray at room temperature covered loosely for up to 24 hours.
Ingredient Substitutions
If you want to reduce dairy, substitute plant-based butter for both the batter and frosting, and replace heavy cream with full-fat coconut milk—expect a subtle coconut undertone. To make these nut-free, ensure your chocolate chips are processed in a nut-free facility. For a gluten-free option, use a 1:1 gluten-free flour blend and reduce mixing to avoid gum activation. If instant espresso isn’t available, finely ground espresso or even a teaspoon of instant coffee will work—dissolve it in the brewed coffee to distribute evenly.
Serving Suggestions
Serve these squares warm with a scoop of vanilla or coffee ice cream and a drizzle of chocolate sauce for a decadent dessert. For brunch, pair with strong black coffee or a creamy latte to echo the espresso notes. Garnish with flaky salt and chocolate shavings for an upscale presentation. For a party platter, arrange on a board with fresh berries and salted nuts to offset the sweetness.
Seasonal Adaptations
In cooler months, add a pinch of cinnamon or a quarter teaspoon of ground cardamom to the batter for warming spice. For the holidays, fold in a half cup of chopped toasted hazelnuts or replace the mini chips with peppermint baking chips and top with crushed candy cane for a festive twist. In summer, lighten the frosting by reducing powdered sugar by half and adding whipped cream for a cloud-like topping—serve immediately.
Meal Prep Tips
To prep ahead for events, bake the slab two days in advance and store unfrosted in the refrigerator. Make the frosting on the morning of the event and spread just before serving for the freshest texture. For individually wrapped gifts, cool and frost, then slice and wrap each square in parchment and place in a small box with a ribbon. Label slices with reheating instructions: microwave 10–12 seconds for a warm bite.
These frosted coffee brownies are a simple way to bring a little ceremony to everyday life. Whether you bake them for a special occasion or a quiet afternoon treat, they reward patience and small rituals—let the flavors deepen overnight, and the crumbs will tell you it was worth the wait.
Pro Tips
Bring eggs to room temperature to ensure a glossy, emulsified batter and even rise.
Use warm, not hot, melted butter when adding eggs to avoid cooking them; cool 2–3 minutes before whisking in.
Check doneness early: a toothpick with moist crumbs indicates a fudgy center—avoid waiting for a clean toothpick.
This nourishing frosted coffee brownies recipe is sure to be a staple in your kitchen. Enjoy every moist, high protein slice — it is perfect for breakfast or as a wholesome snack any time.
Tags
Frosted Coffee Brownies
This Frosted Coffee Brownies recipe makes perfectly juicy, tender, and flavorful steak every time! Serve with potatoes and a side salad for an unforgettable dinner in under 30 minutes.
Ingredients
Coffee Brownies
Espresso Frosting
Instructions
Preheat and prepare the pan
Preheat oven to 350°F and line a 9x13-inch pan with parchment paper, leaving an overhang. Lightly butter the parchment to ensure easy removal.
Melt butter and mix with sugar
Melt 1 cup (2 sticks) butter and stir in 2 cups sugar until mostly dissolved. Cool 2–3 minutes to avoid cooking the eggs when added.
Add eggs and flavor
Whisk in four room-temperature eggs one at a time until glossy, then stir in 1 teaspoon vanilla and 1 teaspoon salt for balance.
Incorporate cocoa and coffee
Sift in 1/3 cup cocoa powder and fold gently, then add 1/4 cup cooled strong brewed coffee and 1 tablespoon instant espresso powder to deepen flavor.
Fold in flour and chips
Fold 1 cup flour into the batter until just combined; stir in 1/2 cup mini chocolate chips if desired, taking care not to overmix.
Bake
Pour into the prepared pan and bake 30–35 minutes at 350°F. Test at 28 minutes; a toothpick should come out with moist crumbs for a fudgy center.
Cool and unmold
Cool on a wire rack at least 1 hour, then lift out using the parchment overhang for easier frosting and slicing.
Prepare the frosting
Beat 1/2 cup softened butter, gradually add 3 cups powdered sugar alternating with 3 tablespoons cooled coffee, then add instant espresso, cream, vanilla, and salt until silky.
Frost and garnish
Spread frosting over fully cooled brownies, garnish as desired, chill briefly to set, and slice into 16 squares.
Last Step: Please leave a rating and comment letting us know how you liked this recipe! This helps our business to thrive and continue providing free, high-quality recipes for you.
Nutrition
Did You Make This?
Leave a comment & rating below or tag
@snapyrecipe on social media!
Categories:
You might also like...

5-Minute Thanksgiving Appetizers That Wow Every Guest
A fast, elegant bite for Thanksgiving: creamy cheese, bright cranberry, crunchy pecans and rosemary on crackers or baguette — ready in five minutes and loved by all.

Air Fryer Bang Bang Chicken Skewers
Crispy air-fried chicken skewers tossed in a creamy, sweet-spicy bang bang sauce — a quick, crowd-pleasing weeknight favorite.

Air Fryer Honey Butter Garlic Chicken Tenders
Crispy air-fried chicken tenders coated in a sticky honey-butter garlic glaze — quick, family-friendly, and ready in about 25 minutes.
Did You Make This?
Leave a comment & rating below or tag @snapyrecipe on social media!
Rate This Recipe
Share This Recipe
Enjoyed this recipe? Share it with friends and family, and don't forget to leave a review!
Comments (1)
This recipe looks amazing! Can't wait to try it.
Comments are stored locally in your browser. Server comments are displayed alongside your local comments.
Hi, I'm Natalia!
What's Popular

Get My 30-Minute Meals email series!
Quick and easy dinner ideas delivered to your inbox.