
Gnome Mini Cheesecakes

Tiny, whimsical cheesecakes crowned with a strawberry hat, whipped-cream beard, and a candy-nose — perfect for parties, holidays, or an afternoon treat.
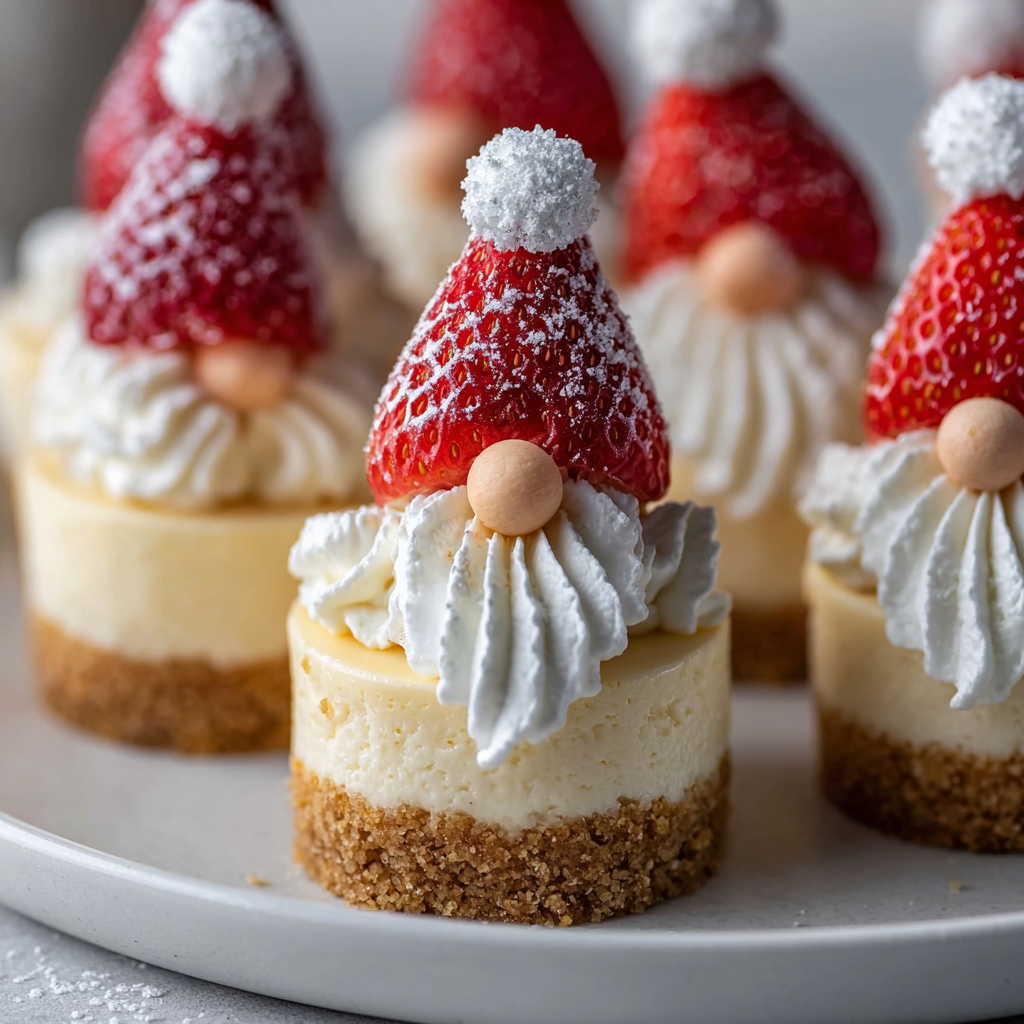
This recipe for Gnome Mini Cheesecakes is my favorite party trick: tiny, perfectly creamy bites of classic cheesecake dressed up as charming gnomes. I first made these during a spring family brunch when my niece wanted something “fun and fancy” but also easy enough for me to prep between dishes. The result—velvety filling, crisp graham crust, and a bright strawberry hat—was so delightful that everyone lined up for seconds. They’re small but indulgent, with the familiar tang of cream cheese balanced by a whisper of sour cream and vanilla.
What makes these especially memorable is how quickly they transform a simple dessert into something playful. The texture is silky and dense in the center, with a delicate, buttery crust that snaps on the first bite. The strawberry hat adds freshness and a pop of color, while the dollop of whipped cream becomes the gnome’s beard—soft, light, and just sweet enough. I love that they’re individually portioned: there’s no awkward slicing, and the presentation is always a conversation starter.
Why You'll Love This Recipe
- Ready in about 45 minutes from start to finish, including baking and quick cooling—ideal for last-minute guests or a festive table.
- Uses pantry staples: graham cracker crumbs, cream cheese, sugar, eggs—no exotic ingredients required.
- Perfect for make-ahead: prepare the filling and crust the day before, then assemble and decorate the day of serving.
- Crowd-pleaser across ages: kids love the whimsical gnome look; adults appreciate the balance of creamy and tangy flavors.
- Portable and portion-controlled: great for picnics, potlucks, showers, or themed parties—no messy slices or plates needed.
- Customizable decorations let you adapt to themes or dietary swaps (see substitutions section for tips).
On my first try, I underestimated how many decorations I’d need—my daughter insisted on extra candy noses for dramatic effect. The family loved how the strawberries added a bright note that cut through the richness. These have become our go-to bite for spring gatherings because they’re pretty enough for photos but straightforward enough to make on a weekday evening.
Ingredients
- Crust: 1 cup graham cracker crumbs, 3 tablespoons melted butter, 2 tablespoons granulated sugar. I usually buy Nabisco or Keebler graham crackers and pulse them in a food processor for fine crumbs; the butter binds the crumbs so the base holds when you remove the mini cheesecakes from the tin.
- Filling: 16 ounces (2 blocks) cream cheese, softened, 1/2 cup granulated sugar, 1 teaspoon vanilla extract, 2 large eggs, 1/4 cup sour cream or plain Greek yogurt. I prefer Philadelphia cream cheese for consistent texture; bring it fully to room temperature so the filling mixes ultra-smooth without lumps.
- Decoration: Fresh strawberries (1 per cheesecake), whipped cream (store-bought or homemade), mini white chocolate chips or small candy pearls for noses, and powdered sugar for a light dusting. Choose firm, ripe strawberries for best shape and color—Hull them just before assembling to keep them fresh.
Instructions
Prepare the crust: Preheat oven to 325°F (about 165°C). Line a 12-cup muffin tin with paper liners. Combine 1 cup graham cracker crumbs, 3 tablespoons melted butter, and 2 tablespoons sugar in a bowl. Press about 1 tablespoon of the crumb mixture firmly into the bottom of each lined cup to form an even base. Bake 5 minutes to set—this step prevents a soggy bottom and gives a slight toasty flavor to the crust. Make the filling: Using a stand mixer or hand mixer, beat 16 ounces softened cream cheese with 1/2 cup sugar until smooth and free of lumps (about 2–3 minutes on medium). Scrape the bowl, add 1 teaspoon vanilla, then beat in eggs one at a time until combined. Fold in 1/4 cup sour cream or Greek yogurt until the batter is glossy and smooth. Avoid overmixing once the eggs are added to prevent incorporating too much air, which can cause cracks. Fill and bake: Divide the filling evenly among the prepared cups (about 2 tablespoons per cup). Smooth the tops with the back of a spoon. Bake at 325°F for 15–18 minutes, until the edges are set but the center still jiggles slightly—this ensures a creamy interior. Turn the oven off and leave the tin inside with the door cracked for 10 minutes to reduce shock and prevent cracking. Cool and chill: Remove the tin and let the cheesecakes cool at room temperature for 30 minutes, then refrigerate for at least 2 hours (preferably 4) to fully set. Chilling overnight improves texture and makes decorating easier. Decorate as gnomes: When chilled, top each mini cheesecake with a generous swirl of whipped cream to form the beard. Place a hulled strawberry upside-down as the hat, and tuck a mini white chocolate chip or candy pearl between the whipped cream and the strawberry for a nose. Dust lightly with powdered sugar for a snowy finish.
You Must Know
- These keep well refrigerated for up to 3 days in an airtight container—place parchment between layers to prevent sticking.
- They freeze well for up to 3 months un-decorated; thaw overnight in the refrigerator and add fresh strawberries and whipped cream before serving.
- Each mini contains dairy and eggs; not gluten-free unless you use certified gluten-free crumbs, and not dairy-free unless you use specialty substitutes.
- Use room-temperature cream cheese to avoid lumps and to reduce mixing time—cold blocks create a grainy batter and require more mixing.
What I adore most is how the simple decoration elevates a humble cheesecake into something playful—guests always smile. Once, for a garden party, a friend arranged them into a miniature village on a mossy board; they were gone in minutes. The combination of textures—crisp crust, creamy filling, fresh fruit—makes each bite rounded and satisfying.
Storage Tips
Store finished, decorated cheesecakes in a single layer in an airtight container in the refrigerator for up to 3 days. For longer storage, freeze undecorated minis on a baking sheet until solid, then transfer to a sealed freezer bag or container for up to 3 months. Thaw in the refrigerator overnight. Avoid freezing whipped cream or fresh strawberries; add them after thawing for best texture. When transporting, place them on a flat tray with a slight ridge and use a cooler with ice packs for longer trips to keep temperatures safe.
Ingredient Substitutions
If you need to adapt, substitute the sour cream with an equal amount of plain Greek yogurt for tang and structure—full-fat gives the creamiest result. For a gluten-free version, swap graham crumbs for certified gluten-free graham or almond flour (use 3/4 cup almond flour plus 2 tablespoons melted butter). To make them dairy-free, use a high-quality vegan cream cheese and a plant-based yogurt; note the texture will be slightly softer and flavors may differ. If you’d like a citrus twist, fold in 1 teaspoon finely grated lemon zest into the filling.
Serving Suggestions
Serve these on a flat platter lined with parchment or a decorative cake stand for impact. Pair with a light tea or a sparkling wine for brunch occasions. For a richer pairing, serve alongside salted caramel drizzle or berry compote. Garnish with micro mint leaves or edible flowers for spring events. Because each is individually portioned, they’re excellent for appetizer-style dessert platters where guests can take one and mingle.
Cultural Background
The mini cheesecake is a modern twist on the classic New York-style cheesecake, popular across American celebrations. Turning them into gnomes is purely playful—gnomes as whimsical figures appear in Northern European folklore, often associated with gardens and hearths. The idea of decorating food to match seasonal or cultural motifs dates back centuries; bite-sized, decorated sweets became especially popular in the 20th century with the rise of entertaining culture and themed parties.
Seasonal Adaptations
In summer, use ripe strawberries or a combination of raspberries and blueberries for a bright version. For autumn, swap the graham crust for gingersnap crumbs and top with a roasted pear half and caramelized nuts. During winter holidays, add a touch of cinnamon or nutmeg to the crust and decorate with a candied cranberry hat. These small swaps allow the same base to feel fresh for every season.
Meal Prep Tips
Make the crusts and filling a day ahead: press and par-bake the crusts, then store covered in the fridge. Mix the filling and keep it chilled; fill and bake the day you plan to serve for the best texture. If you’re preparing several trays, rotate them in the oven for even baking and check centers for that slight jiggle. Use a small cookie scoop to portion filling evenly—this speeds assembly and gives uniform results for presentation.
These gnome minis are a small joy to make and to share. The simple technique delivers professional-looking results, while the playful decorations make them unforgettable. Try them for your next gathering—you might just start a new tradition.
Pro Tips
Always bring cream cheese fully to room temperature to avoid lumps and shorten mixing time.
Par-bake the crust for 5 minutes to keep it crisp under the moist filling.
Bake until the edges are set but the center still jiggles slightly; this ensures a creamy interior.
Chill minis for at least 2 hours—overnight chilling yields the best texture for slicing or decorating.
This nourishing gnome mini cheesecakes recipe is sure to be a staple in your kitchen. Enjoy every moist, high protein slice — it is perfect for breakfast or as a wholesome snack any time.
Tags
Gnome Mini Cheesecakes
This Gnome Mini Cheesecakes recipe makes perfectly juicy, tender, and flavorful steak every time! Serve with potatoes and a side salad for an unforgettable dinner in under 30 minutes.
Ingredients
Crust
Filling
Decoration
Instructions
Prepare the crust
Preheat oven to 325°F. Line a 12-cup muffin tin with paper liners. Mix graham crumbs, melted butter, and sugar; press about 1 tablespoon into each liner. Par-bake for 5 minutes and set aside to cool slightly.
Make the filling
Beat softened cream cheese with sugar until smooth. Add vanilla, then beat in eggs one at a time. Fold in sour cream or Greek yogurt until the mixture is glossy and lump-free. Avoid overmixing after adding eggs.
Fill and bake
Spoon the filling into prepared crusts (about 2 tablespoons each). Smooth tops and bake at 325°F for 15–18 minutes until edges are set and centers jiggle slightly. Cool in oven with door cracked for 10 minutes.
Chill and decorate
Cool to room temperature, then refrigerate for at least 2 hours. When ready, pipe whipped cream to form beards, invert strawberries as hats, add a candy nose, and dust with powdered sugar.
Last Step: Please leave a rating and comment letting us know how you liked this recipe! This helps our business to thrive and continue providing free, high-quality recipes for you.
Nutrition
Did You Make This?
Leave a comment & rating below or tag
@snapyrecipe on social media!
Categories:
You might also like...

5-Minute Thanksgiving Appetizers That Wow Every Guest
A fast, elegant bite for Thanksgiving: creamy cheese, bright cranberry, crunchy pecans and rosemary on crackers or baguette — ready in five minutes and loved by all.

Air Fryer Bang Bang Chicken Skewers
Crispy air-fried chicken skewers tossed in a creamy, sweet-spicy bang bang sauce — a quick, crowd-pleasing weeknight favorite.

Air Fryer Honey Butter Garlic Chicken Tenders
Crispy air-fried chicken tenders coated in a sticky honey-butter garlic glaze — quick, family-friendly, and ready in about 25 minutes.
Did You Make This?
Leave a comment & rating below or tag @snapyrecipe on social media!
Rate This Recipe
Share This Recipe
Enjoyed this recipe? Share it with friends and family, and don't forget to leave a review!
Comments (1)
This recipe looks amazing! Can't wait to try it.
Comments are stored locally in your browser. Server comments are displayed alongside your local comments.
Hi, I'm Natalia!
What's Popular

Get My 30-Minute Meals email series!
Quick and easy dinner ideas delivered to your inbox.