
Healthy Coconut Vanilla Protein Bars

No-bake, nutrient-dense coconut vanilla bars made with vanilla protein powder, nut butter, and a hint of coconut — perfect for snacks and meal prep.

This coconut vanilla protein bar has become my go-to snack when I need something that’s both satisfying and simple. I first developed this combination on a busy Sunday afternoon when pantry staples were all I had on hand and I wanted a portable option to fuel long workdays and weekend hikes. The balance of creamy nut butter, fragrant vanilla, and toasted coconut delivers a texture that’s chewy without being gummy, and the bars hold together nicely whether you chill them or freeze them briefly.
What makes these bars special is how forgiving the formula is. You can swap between peanut butter and almond butter, choose honey or maple syrup depending on your taste, and adjust a tablespoon of coconut flour if you prefer firmer bites. They’re sweet but not cloying, with a subtle coconut finish and a vanilla lift from the protein powder. Every batch I make gets eaten fast — family members love them with coffee in the morning and I take them on long walks for a quick protein boost.
Why You'll Love This Recipe
- Ready with minimal hands-on time in about 15 minutes, then set in the fridge — great for busy mornings or an afternoon energy boost.
- Uses pantry staples like nut butter and shredded coconut, so you can usually make a batch without a special grocery trip.
- Customizable: choose plant-based or whey protein, swap honey for maple syrup, and add 1–2 tablespoons of coconut flour if you want firmer bars.
- No baking required — ideal for warm weather or when you don’t want to heat the kitchen.
- Perfect for meal prep: they keep well refrigerated for a week and freeze beautifully for longer storage, making grab-and-go snacks simple.
- Balanced macros for a snack: a good mix of fat, protein, and moderate carbs keeps you satisfied between meals.
In my kitchen these bars have become a ritual: I whisk the wet ingredients while the kids set the parchment, and by the time we finish packing lunches the mixture is chilling. Friends always comment on the coconut aroma, and I love how forgiving the texture is — a little extra coconut flour makes them dense and transportable, while skipping it yields a softer chew that’s great with coffee.
Ingredients
- 1 cup vanilla protein powder: Use your preferred brand — plant-based blend for a vegan option or whey for a creamier mouthfeel. Look for powders labeled gluten-free if you have sensitivity. The vanilla gives a sweet, aromatic base that keeps added sugar minimal.
- 1/2 cup creamy nut butter: Choose unsweetened peanut butter or almond butter. Natural brands with just nuts and salt (like Smucker's Natural or Justin's) give the cleanest flavor and help the bars set without extra sugar.
- 1/4 cup honey or maple syrup: Honey adds a floral sweetness while maple gives a deeper, caramel note. Either binds the mixture and provides moisture — use the one you prefer.
- 1/4 cup melted coconut oil: Adds richness and helps the mixture firm up in the fridge. Gently melt using a microwave or a small saucepan to avoid overheating.
- 1 tsp vanilla extract: A splash of pure vanilla amplifies the vanilla protein powder and rounds the flavor.
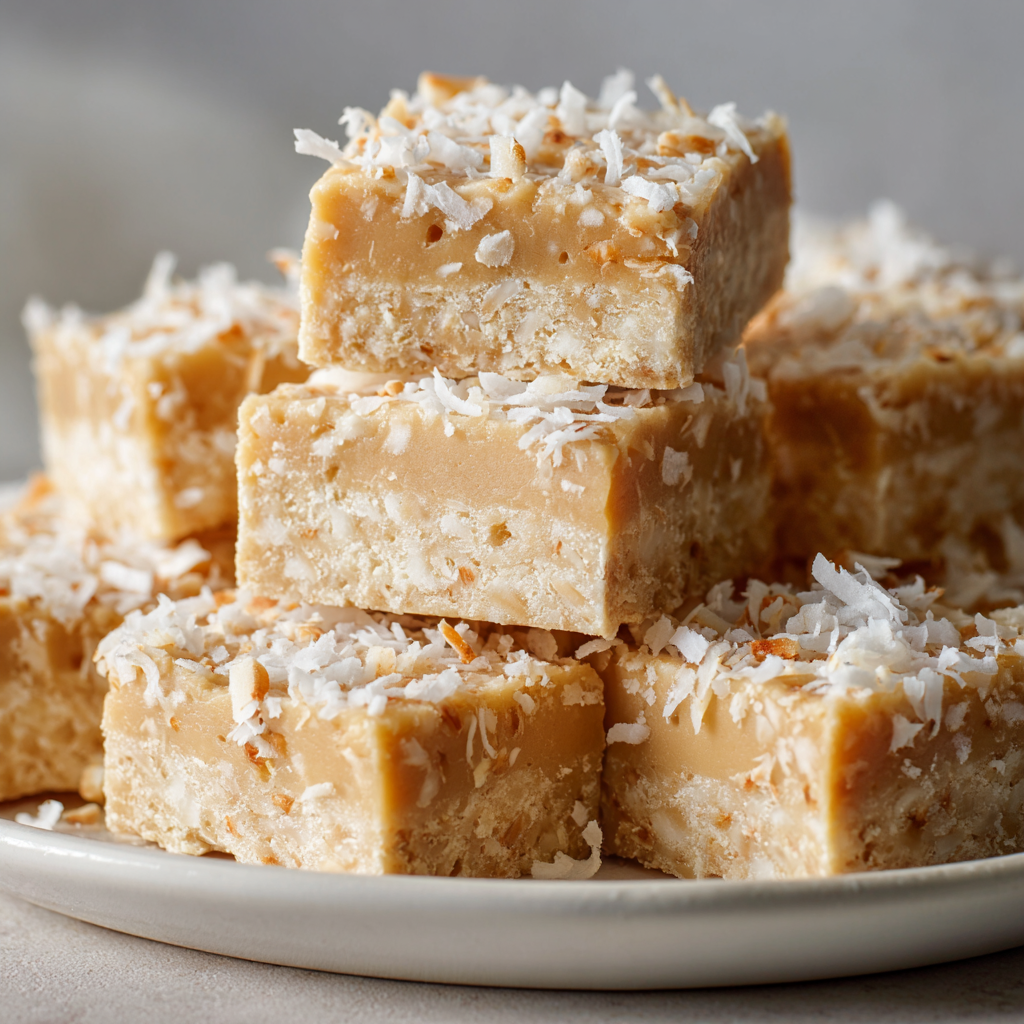
- 1 cup unsweetened shredded or flaked coconut: Provides chew and a pronounced coconut character; prefer unsweetened to control sweetness. For more texture use flaked coconut, shredded for a uniform bar.
- Pinch of sea salt: Balances sweetness and brightens flavors. Use flaky sea salt if you like little bursts on top.
- Optional - 1–2 tbsp coconut flour: Add only if the mixture is too sticky — coconut flour is highly absorbent and firms bars without changing flavor much.
- Optional topping: Extra shredded coconut or a light drizzle of melted white chocolate for an indulgent finish.
Instructions
Line the pan:Line an 8x8-inch square baking dish with parchment paper, leaving a 1-2 inch overhang on two sides. This creates handles to lift the set slab cleanly out of the pan and keeps the edges tidy when slicing.Mix the wet ingredients:In a medium bowl combine 1/2 cup creamy nut butter, 1/4 cup honey or maple syrup, 1/4 cup melted coconut oil, and 1 tsp vanilla extract. Stir until the mixture is homogeneous and glossy; if the nut butter is stiff, warm it slightly to make mixing easier. The goal is a smooth emulsion so dry ingredients disperse evenly.Add the dry ingredients:Stir in 1 cup vanilla protein powder, 1 cup unsweetened shredded or flaked coconut, and a pinch of sea salt. Fold gently until combined. If the mixture looks too loose to hold shape, sprinkle in 1 tablespoon of coconut flour, mix, and add a second tablespoon only if needed — coconut flour quickly firms mixtures.Press and shape:Transfer the mixture into the prepared pan and press it firmly and evenly into all corners using a spatula or the bottom of a measuring cup wrapped in parchment. Pressing tightly reduces air pockets and helps bars cut cleanly after chilling.Chill to set:Refrigerate for 1 to 2 hours until firm. For a quicker set, place the pan in the freezer for about 30 minutes. The coconut oil will solidify and bind everything together; check after 30 minutes to avoid freezing too hard.Slice and serve:Use the parchment overhang to lift the slab from the dish. Place on a cutting board and slice into 10 to 12 bars with a sharp knife, wiping the knife between cuts for neat edges. Garnish with extra shredded coconut or a drizzle of melted white chocolate if desired.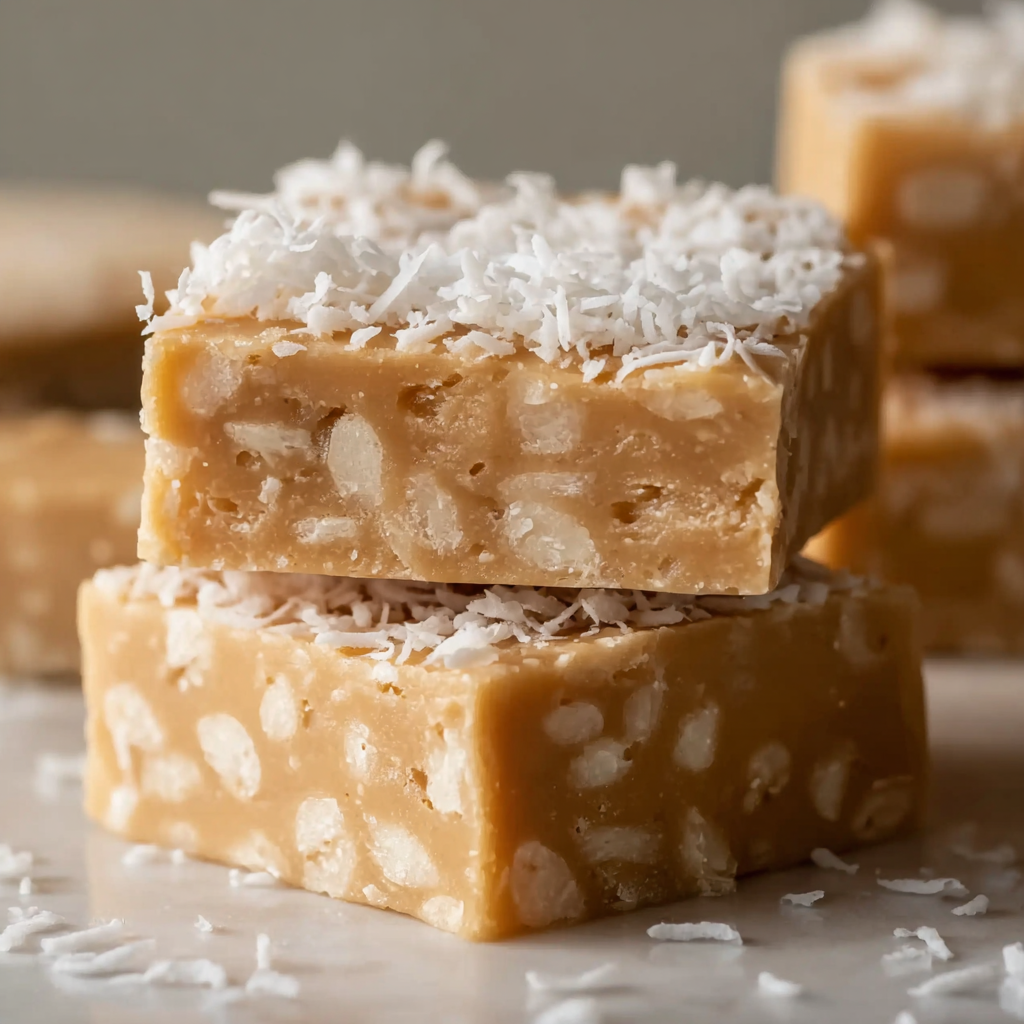
You Must Know
- These bars keep well refrigerated for up to 7 days and can be frozen for 2–3 months; thaw in the fridge overnight for best texture.
- Use unsweetened shredded coconut to control added sugars — sweetened coconut will make the bars noticeably sweeter and softer.
- If using whey protein and you need dairy-free bars, swap to a plant-based vanilla powder and use maple syrup instead of honey to make them vegan-friendly.
- Texture balance: add up to 2 tablespoons coconut flour if mixture is too sticky; add no more than recommended as it will absorb liquid quickly and dry out the mix.
My favorite aspect is how portable they are: I keep a small container in the fridge and everyone grabs one before heading out. Once, I packed them for a beach picnic and a friend mistook them for candy bars — she was surprised to learn they’re made from pantry staples and protein powder. The coconut aroma always sparks compliments, and the simplicity means I can tweak each batch based on what’s in the pantry.
Storage Tips
Store the bars in an airtight container in the refrigerator for up to 7 days. For longer storage, layer parchment between bars and freeze in a zip-top bag for up to 3 months. To thaw, move bars from the freezer to the fridge overnight or let sit at room temperature for 15–20 minutes before eating. Avoid storing at room temperature for more than a day in warm climates, as the coconut oil can soften and cause the bars to lose structure. If you plan to travel with them, keep them in a small cooler pack to maintain firmness.
Ingredient Substitutions
Swap nut butter types freely: peanut butter yields a robust, savory note, while almond butter offers a milder, more neutral flavor. For vegan bars, use plant-based vanilla protein and maple syrup. If you don’t have coconut oil, a neutral oil like melted refined avocado oil can work but will slightly change the mouthfeel. To add crunch, fold in 1/4 cup chopped toasted almonds or a tablespoon of chia seeds — note that seeds can alter hydration so expect a modest shift in texture. White chocolate drizzle is optional and will add sweetness; dark chocolate pairs well if you prefer less sweetness.
Serving Suggestions
Serve slices with a cup of coffee or a small bowl of Greek yogurt for a more filling snack. They also make a convenient pre- or post-workout bite paired with a banana. For presentation, stack bars on a platter dusted with extra shredded coconut and a sprinkle of flaky sea salt. These bars are great for picnic boxes, lunchboxes, or as a portable dessert at potlucks; they pair especially well with fresh fruit like berries or sliced apples.
Cultural Background
While energy bars have global roots in portable snacks and trail foods, these coconut-vanilla bars draw inspiration from tropical flavors where coconut is prominent. The no-bake format resembles many traditional slice-and-set sweets found in home kitchens worldwide, where coconut and nuts form the base of quick confections. Adapting pantry ingredients into a protein-fortified bar is a modern twist that suits contemporary health-focused eating habits.
Seasonal Adaptations
In summer, make the bars slightly softer by reducing coconut flour and serving chilled. For winter, add a pinch of ground cinnamon and substitute maple syrup for honey to introduce warm, autumnal notes. During holiday seasons, fold in 1/4 cup dried cranberries and toasted pecans, or top with a thin layer of melted dark chocolate and a sprinkle of toasted coconut for a festive treat.
Meal Prep Tips
Prepare a double batch and freeze half for future weeks. Portion into single servings and wrap each in parchment to make grab-and-go snacks. Label containers with the date and rotate older batches to the front of your freezer. When meal prepping, keep a small wedge of parchment over the slab; pressing and slicing while slightly chilled gives the cleanest edges. These bars are ideal for packing into lunchboxes or for athletes needing a quick protein boost mid-day.
These coconut vanilla bars are simple, adaptable, and reliably loved by family and friends. They bridge the line between sweet and wholesome, and once you find the texture you prefer — firmer or chewier — they’ll become a pantry staple you return to again and again.
Pro Tips
Warm stiff natural nut butter slightly to make mixing easier and ensure a smooth batter.
If mixture is too sticky, add coconut flour 1 tablespoon at a time; stop when you reach desired firmness.
Press the mixture firmly into the pan to remove air pockets for neater slicing.
Wipe your knife clean between cuts to get clean edges when slicing bars.
This nourishing healthy coconut vanilla protein bars recipe is sure to be a staple in your kitchen. Enjoy every moist, high protein slice — it is perfect for breakfast or as a wholesome snack any time.
FAQs about Recipes
Can these be made vegan?
Yes — use a plant-based vanilla protein powder and maple syrup instead of honey to make the bars vegan.
How long to chill to set bars?
Yes — freeze for 30 minutes for a firmer set or refrigerate for 1–2 hours for a softer bite.
Tags
Healthy Coconut Vanilla Protein Bars
This Healthy Coconut Vanilla Protein Bars recipe makes perfectly juicy, tender, and flavorful steak every time! Serve with potatoes and a side salad for an unforgettable dinner in under 30 minutes.
Ingredients
Main
Instructions
Line the pan
Line an 8x8-inch square baking dish with parchment paper, leaving a 1-2 inch overhang on two sides to lift the bars out easily after setting.
Mix the wet ingredients
In a medium mixing bowl combine 1/2 cup nut butter, 1/4 cup honey or maple syrup, 1/4 cup melted coconut oil, and 1 tsp vanilla extract. Stir until smooth and well blended.
Add the dry ingredients
Stir in 1 cup vanilla protein powder, 1 cup shredded or flaked coconut, and a pinch of sea salt. If mixture is too soft, add 1–2 tbsp coconut flour, one tablespoon at a time.
Press and shape
Transfer the mixture into the prepared pan and press down evenly using a spatula or the back of a spoon to ensure the mix reaches all corners and compresses tightly.
Chill to set
Refrigerate for 1–2 hours until firm. For a faster set, place in the freezer for about 30 minutes, checking to avoid over-freezing.
Slice and serve
Lift the slab from the pan using the parchment overhang and cut into 10–12 bars with a sharp knife. Top with extra shredded coconut or drizzle with melted white chocolate if desired.
Last Step: Please leave a rating and comment letting us know how you liked this recipe! This helps our business to thrive and continue providing free, high-quality recipes for you.
Nutrition
Did You Make This?
Leave a comment & rating below or tag
@snapyrecipe on social media!
Categories:
You might also like...

5-Minute Thanksgiving Appetizers That Wow Every Guest
A fast, elegant bite for Thanksgiving: creamy cheese, bright cranberry, crunchy pecans and rosemary on crackers or baguette — ready in five minutes and loved by all.

Air Fryer Bang Bang Chicken Skewers
Crispy air-fried chicken skewers tossed in a creamy, sweet-spicy bang bang sauce — a quick, crowd-pleasing weeknight favorite.

Air Fryer Honey Butter Garlic Chicken Tenders
Crispy air-fried chicken tenders coated in a sticky honey-butter garlic glaze — quick, family-friendly, and ready in about 25 minutes.
Did You Make This?
Leave a comment & rating below or tag @snapyrecipe on social media!
Rate This Recipe
Share This Recipe
Enjoyed this recipe? Share it with friends and family, and don't forget to leave a review!
Comments (1)
This recipe looks amazing! Can't wait to try it.
Comments are stored locally in your browser. Server comments are displayed alongside your local comments.
Hi, I'm Natalia!
What's Popular

Get My 30-Minute Meals email series!
Quick and easy dinner ideas delivered to your inbox.