
Indulgent Hot Cocoa Peppermint Cheesecake Bites

Mini no-bake bites that marry creamy chocolate cheesecake with bright peppermint crunch—perfect for holiday parties and cozy nights in.
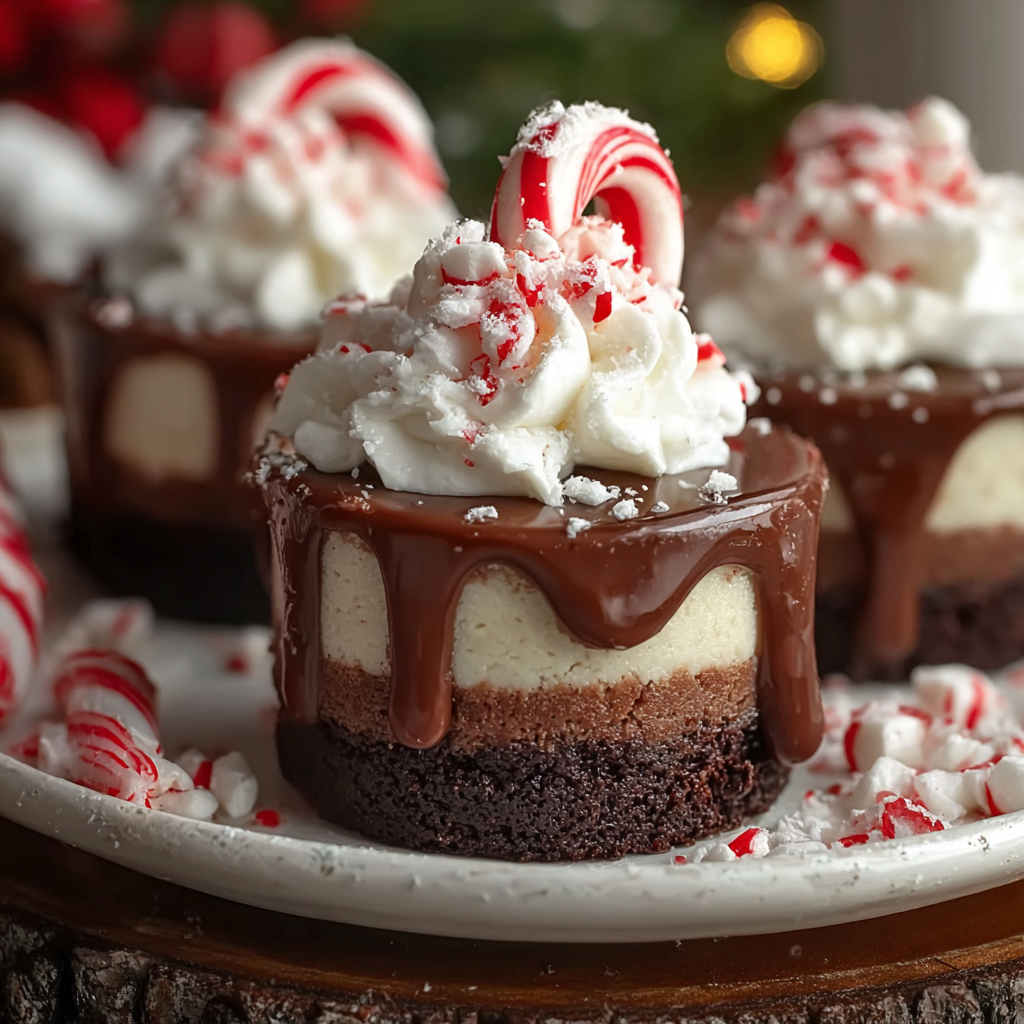
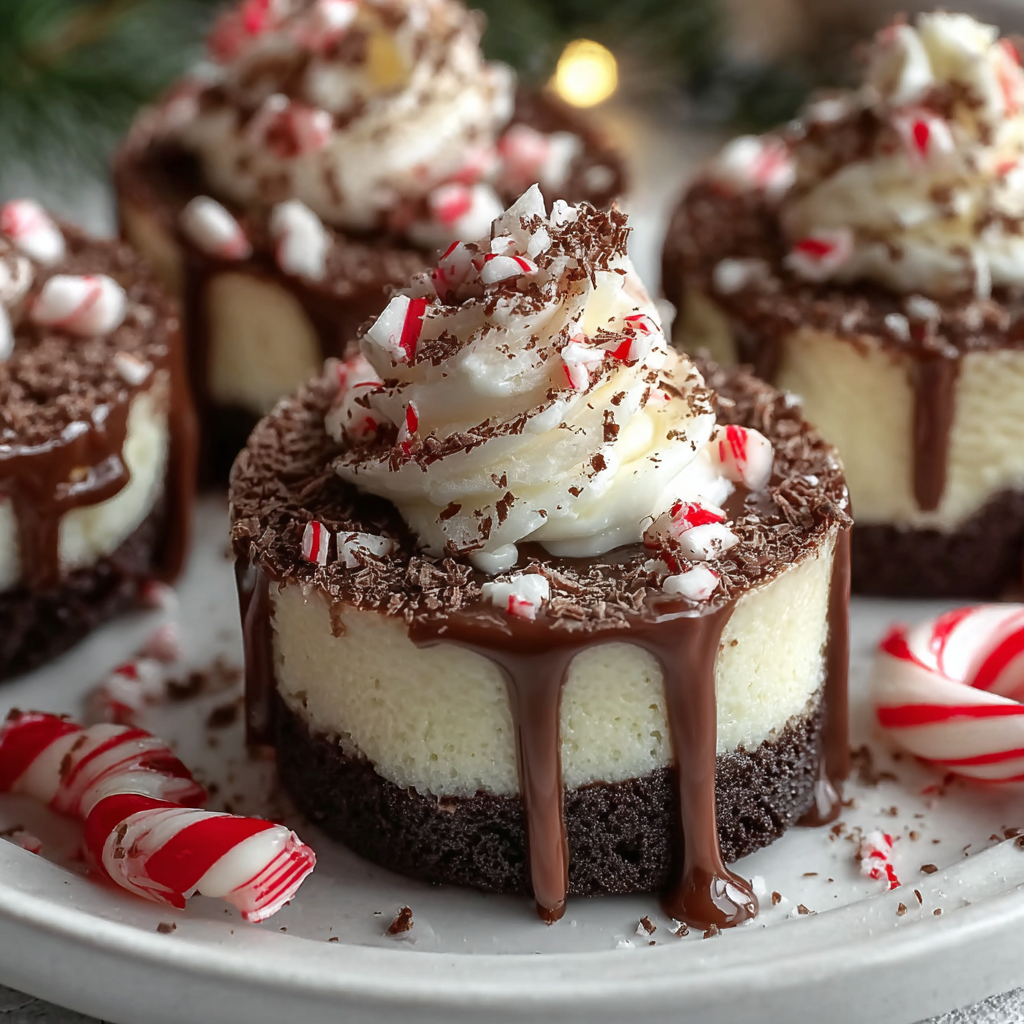
This indulgent hot cocoa peppermint cheesecake bites recipe arrived in my kitchen the same winter my son learned to whistle: a small triumph turned celebration. I was looking for a festive, make-ahead treat that combined the warm nostalgia of hot chocolate with a cool peppermint finish, and the result surprised everyone. These bite-sized morsels are rich and velvety, with a deep chocolate base and a fresh peppermint lift that cleanses the palate after each decadent mouthful. They feel luxurious but are shockingly simple to make.
I discovered this combination during a holiday bake-a-thon when pantry staples and a jar of crushed peppermint collided with cream cheese leftover from another dessert. The first tray vanished in ten minutes, and the recipe has been our go-to for winter gatherings and last-minute hostess gifts ever since. The texture is the star: a creamy cheesecake center that’s lightened with whipped cream, sat on a crunchy chocolate-graham crumb base, then dipped in glossy chocolate and studded with peppermint flakes. It’s a tiny package of contrasting textures and familiar flavors that always gets a second helping request.
Why You'll Love This Recipe
- Ready mostly without an oven: active prep is about 20 minutes and then chilling time, so you can assemble quickly while you entertain or wrap gifts.
- Uses pantry staples and a few festive extras: cream cheese, cocoa, graham crumbs, and crushed peppermint make it easy to pull together last minute.
- Make-ahead friendly: freeze or refrigerate until firm, which makes it perfect for parties and gifting; they keep shape beautifully.
- Crowd-pleasing portion size: mini bites mean guests can sample more without feeling overindulgent and they’re ideal for dessert platters.
- Flexible for dietary swaps: swap whipped coconut cream and coconut oil to make dairy-free or use gluten-free crumbs for a gluten-free version.
In my family these have replaced a dozen different cookies at holiday gatherings. People comment on how the peppermint isn’t overpowering but brightens the chocolate, and the frozen texture after dipping in chocolate gives a satisfyingly clean bite every time. I’ve also learned that chilling the bowl of filling helps when piping into liners—it keeps edges neat and saves a lot of clean-up.
Ingredients
- Cream cheese (8 oz): Full-fat cream cheese at room temperature gives the smoothest, richest texture. I prefer Philadelphia for consistency; soften on the counter for 30 minutes so it blends without lumps.
- Powdered sugar (1 cup): Confectioners’ sugar sweetens without grit and helps the filling set slightly. Taste and adjust: start with three quarters of a cup if you prefer less sweet.
- Unsweetened cocoa powder (1/2 cup): Use a high-quality Dutch-processed or natural cocoa depending on how deep you want the flavor; Dutch gives a rounder chocolate note.
- Peppermint extract (1 tsp): A little goes a long way—add cautiously and taste. If you prefer a subtler hint, start with 1/2 teaspoon then increase.
- Whipped cream (1 cup): Stabilized whipped cream, either homemade from heavy cream or store-bought, folded in for lightness. For dairy-free, use chilled whipped coconut cream.
- Chocolate graham cracker crumbs (1 1/2 cups): Provides a chocolatey crunch for the base; substitute regular graham or gluten-free crumbs if needed.
- Melted butter (1/3 cup): Use unsalted butter melted and cooled; coconut oil can be used for dairy-free versions but expect a subtle coconut note.
- Crushed peppermint candies (1 cup): Adds festive crunch and bright flavor—use quality candy canes or hard peppermint candies and crush coarsely.
- Chocolate syrup (to taste) and melted chocolate (for dipping): A dark or semi-sweet melting chocolate works best for a shiny coat; chocolate syrup is optional for drizzling.
Instructions
Prepare the filling: In a large mixing bowl, beat 8 ounces of softened cream cheese with an electric mixer until completely smooth and lump-free, about 2 to 3 minutes. Gradually add 1 cup powdered sugar, then sift in 1/2 cup unsweetened cocoa powder to avoid clumps. Add 1 teaspoon peppermint extract and mix until evenly incorporated. Fold in 1 cup whipped cream gently with a spatula to keep air in the mixture; this lightens the texture and prevents it from feeling dense after freezing. Make the crust: Combine 1 1/2 cups chocolate graham cracker crumbs with 1/3 cup melted butter in a separate bowl. Stir until crumbs are coated and the texture resembles damp sand. If the crumbs seem dry, add a teaspoon of melted butter at a time until they hold together when pressed. Press approximately 1 tablespoon of crumb mixture into the base of each paper-lined mini muffin cup to form a compact crust. Assemble the bites: Using a small cookie scoop or piping bag, fill each crust-lined cup with the chocolate cheesecake mixture until about three quarters full. Smooth tops with the back of a spoon or an offset spatula for neater dipping. Sprinkle crushed peppermint candies over each filled bite so they adhere to the surface before freezing. Chill until firm: Place the mini muffin tin in the freezer for at least 2 hours to firm the bites thoroughly. Chilling overnight is fine and will make them easier to handle when dipping. If storing long-term, transfer bites to an airtight container and freeze for up to 3 months. Dip in chocolate: Melt about 1 cup of chocolate in a microwave-safe bowl in 30-second intervals, stirring between intervals until smooth. Working in batches, lift each frozen bite by the paper liner or use a fork and dip into melted chocolate, letting the excess drip back into the bowl. Return bites to a parchment-lined sheet; add a drizzle of chocolate syrup if desired and press a few extra peppermint crumbs into the topping before the coating sets. Set the coating: Allow the coated bites to set at room temperature for about 10 minutes, or speed up the process by returning them to the refrigerator for 15 to 20 minutes until the chocolate is fully firm. Peel back the liners before serving or leave them on for easier handling at parties.
You Must Know
- High in richness: these bites are calorie-dense and best enjoyed in small portions; they freeze well for up to 3 months in an airtight container.
- Storage: store in the fridge for up to 7 days, or frozen for longer. Keep them sealed to avoid absorbing freezer odors or condensation when thawing.
- Texture note: freezing before dipping ensures a clean, crisp chocolate shell and helps the center retain a slightly firm, scoopable texture.
- Allergens: contains dairy and gluten unless specific swaps are made; also check chocolate labels for soy or nut traces.
My favorite thing about these bites is how quickly they disappear at parties—someone inevitably says they taste like a cross between a truffle and a classic peppermint hot cocoa. One year I handed out small boxes of twelve as hostess gifts and received photos later of empty boxes and happy smiles. They’re that kind of small, festive happiness.
Storage Tips
Store finished bites in a single layer or separated with parchment to prevent sticking. In the refrigerator they keep well for up to 7 days; for longer storage freeze them in a rigid container layered with parchment for up to 3 months. When moving from freezer to counter, avoid condensation by allowing them to thaw in the fridge inside an airtight container for a few hours before serving—this preserves the glossy chocolate finish and prevents soggy crusts. Reheat is unnecessary; serve chilled or slightly softened at room temperature for 10 minutes.
Ingredient Substitutions
To make dairy-free, use whipped coconut cream in place of whipped cream, coconut-based cream cheese alternatives, and swap melted butter for coconut oil. For gluten-free, choose gluten-free chocolate graham crumbs or crushed gluten-free cookies. If peppermint extract is too strong, use crushed peppermint for a milder effect and reduce the extract to 1/2 teaspoon. If you prefer a sweeter profile, swap semi-sweet dipping chocolate for milk chocolate, or add a tablespoon of corn syrup to the melted chocolate for a shinier finish.
Serving Suggestions
Arrange on a simple white platter with extra crushed peppermint sprinkled around the edges for a festive look. Pair with coffee, espresso, or a mug of hot cocoa for a themed dessert station. These bites are perfect on holiday dessert tables, as edible favors wrapped in cellophane, or served after a dinner party for a petite, indulgent finish. Garnish with fine cocoa dust, edible glitter, or an extra drizzle of warm chocolate syrup if you want a more decadent presentation.
Cultural Background
The idea of marrying cream cheese desserts with chocolate and mint flavors draws on long-standing holiday traditions where peppermint is used to brighten rich desserts. Peppermint truffles and chocolate-mint confections are staples in many Western winter celebrations; these bites echo that heritage by compressing familiar flavors into a no-bake, approachable format. The graham cracker base nods to American dessert tradition, reminiscent of classic tarts and cheesecakes.
Seasonal Adaptations
For winter holidays, keep the peppermint strong and use dark chocolate for contrast. In spring, omit peppermint and add a splash of orange extract with candied orange peel for a citrus twist. For summer gatherings, swap the peppermint for crushed berries folded into the filling and use white chocolate for dipping. The structure of the bites supports many seasonal shifts while maintaining a satisfying texture balance.
Meal Prep Tips
Make the crust and filling a day ahead and keep them chilled separately. Press crusts into liners the night before and store in the refrigerator covered; fill and freeze the day of your event for the freshest texture. Use a piping bag with a wide tip to fill liners quickly and evenly. For transport, keep bites in a shallow cooler with ice packs to preserve the chocolate shell.
These little bites have become a ritual in my home: a small dessert that packs big memories. Whether you’re making them for a party, a cozy night in, or as edible gifts, they’re forgiving, festive, and endlessly adaptable—so make them your own and enjoy every creamy, minty mouthful.
Pro Tips
Soften the cream cheese to room temperature for at least 30 minutes to prevent lumps and ensure a silky filling.
Chill the filled cups before dipping in chocolate so the coating sets quickly and creates a crisp shell.
Use a small cookie scoop or piping bag for even portioning and neater presentation.
If melted chocolate thickens while dipping, stir in a teaspoon of neutral oil to restore fluidity.
This nourishing indulgent hot cocoa peppermint cheesecake bites recipe is sure to be a staple in your kitchen. Enjoy every moist, high protein slice — it is perfect for breakfast or as a wholesome snack any time.
FAQs about Recipes
Can I freeze these bites?
Yes. Freeze assembled bites in an airtight container for up to 3 months. Thaw in the refrigerator for a few hours before serving to avoid condensation on the chocolate coating.
How can I reduce the peppermint intensity?
If you prefer a milder peppermint flavor, reduce the peppermint extract to 1/2 teaspoon and rely more on crushed peppermint for texture and aroma.
Tags
Indulgent Hot Cocoa Peppermint Cheesecake Bites
This Indulgent Hot Cocoa Peppermint Cheesecake Bites recipe makes perfectly juicy, tender, and flavorful steak every time! Serve with potatoes and a side salad for an unforgettable dinner in under 30 minutes.
Ingredients
Cheesecake Mixture
Crust
Topping & Finishing
Instructions
Prepare the filling
Beat softened cream cheese until smooth, add powdered sugar and cocoa powder, then peppermint extract. Fold in whipped cream gently until light and homogenous.
Create the crust
Mix chocolate graham crumbs with melted butter until mixture holds together like wet sand. Press about 1 tablespoon into each paper-lined mini muffin cup.
Assemble the bites
Fill each crust-lined cup with the cheesecake mixture until three quarters full. Sprinkle with crushed peppermint and smooth the surface.
Freeze until firm
Freeze assembled bites for at least 2 hours or until completely firm. This step is key for easy dipping and a clean chocolate shell.
Dip in melted chocolate
Melt chocolate in 30-second bursts, stirring until smooth. Dip each frozen bite, allowing excess chocolate to drip off, then return to parchment to set.
Set and serve
Let the chocolate set at room temperature or chill briefly in the refrigerator. Peel liners if desired and serve chilled.
Last Step: Please leave a rating and comment letting us know how you liked this recipe! This helps our business to thrive and continue providing free, high-quality recipes for you.
Nutrition
Did You Make This?
Leave a comment & rating below or tag
@snapyrecipe on social media!
Categories:
You might also like...

5-Minute Thanksgiving Appetizers That Wow Every Guest
A fast, elegant bite for Thanksgiving: creamy cheese, bright cranberry, crunchy pecans and rosemary on crackers or baguette — ready in five minutes and loved by all.

Air Fryer Bang Bang Chicken Skewers
Crispy air-fried chicken skewers tossed in a creamy, sweet-spicy bang bang sauce — a quick, crowd-pleasing weeknight favorite.

Air Fryer Honey Butter Garlic Chicken Tenders
Crispy air-fried chicken tenders coated in a sticky honey-butter garlic glaze — quick, family-friendly, and ready in about 25 minutes.
Did You Make This?
Leave a comment & rating below or tag @snapyrecipe on social media!
Rate This Recipe
Share This Recipe
Enjoyed this recipe? Share it with friends and family, and don't forget to leave a review!
Comments (1)
This recipe looks amazing! Can't wait to try it.
Comments are stored locally in your browser. Server comments are displayed alongside your local comments.
Hi, I'm Natalia!
What's Popular

Get My 30-Minute Meals email series!
Quick and easy dinner ideas delivered to your inbox.