
Simple Dark Chocolate Pumpkin Tart

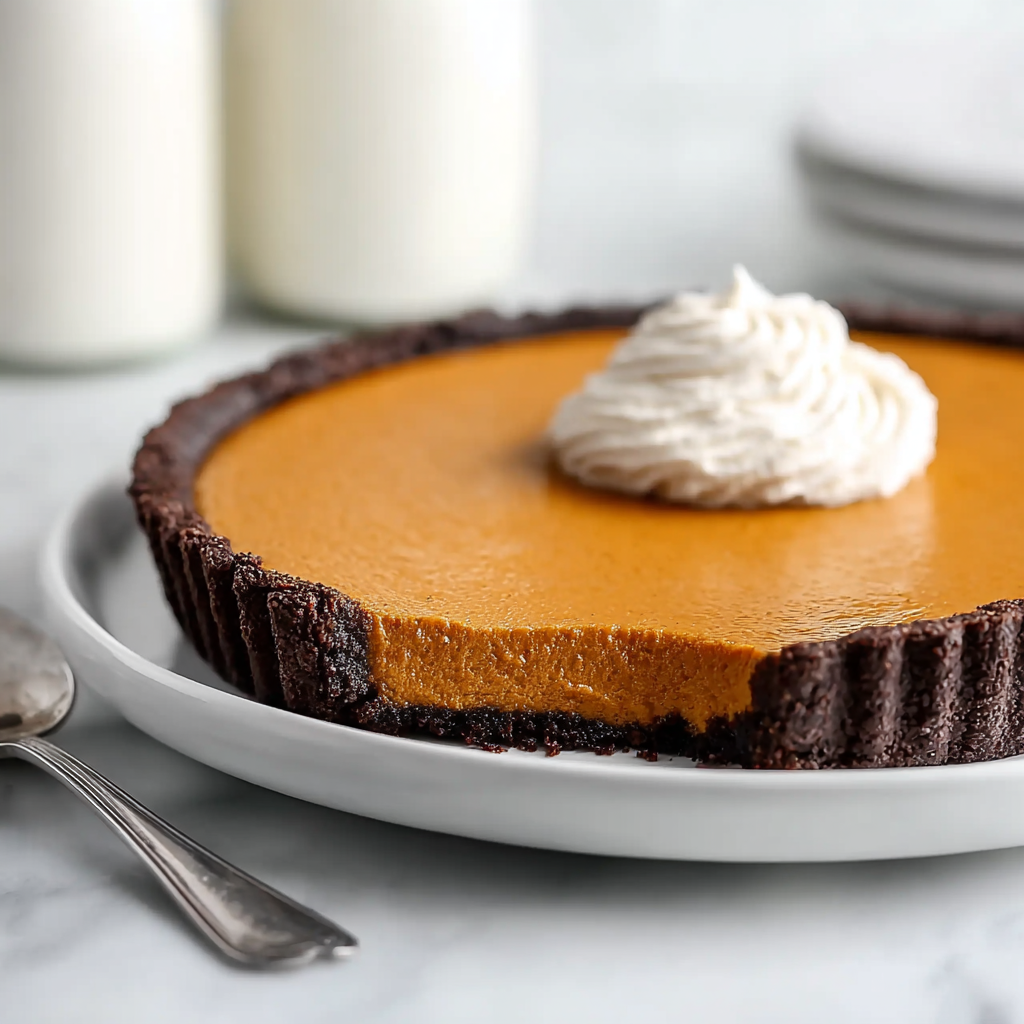
A rich, spiced pumpkin filling nestled in a crisp dark chocolate crust — an elegant, easy-to-make tart perfect for fall gatherings and weeknight indulgence.
This Simple Dark Chocolate Pumpkin Tart became my go-to autumn dessert the first time I tried combining two of my favorite things: intense dark chocolate and warmly spiced pumpkin. I remember the afternoon I first tested this idea — a rainy October day when I wanted something that felt special but didn't demand a full day in the kitchen. The marriage of a bittersweet cocoa crust and velvety pumpkin filling struck the perfect balance between decadent and comforting, and my family declared it a new holiday favorite.
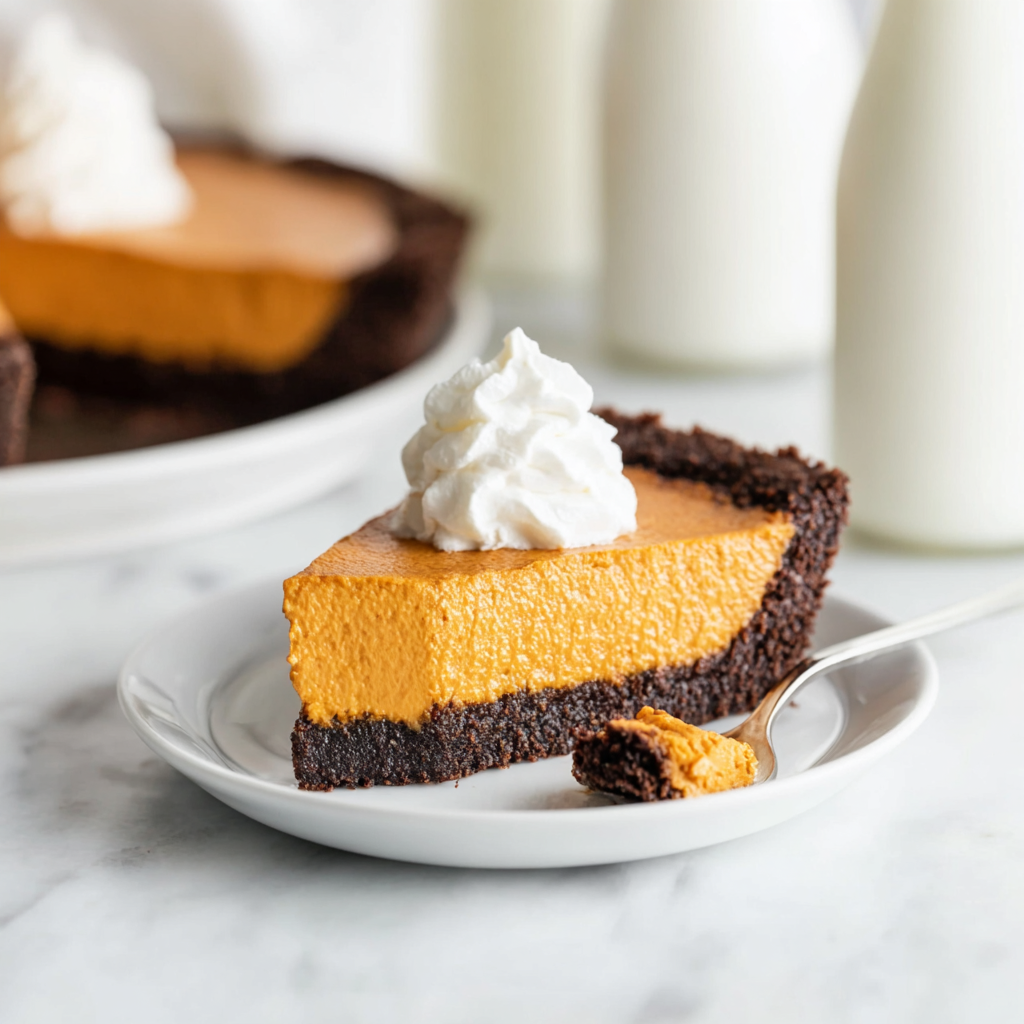
What makes this preparation stand out is its simplicity. The crust is a single-bowl mix you press directly into a tart pan; there’s no rolling or chilling required. The filling, relying on canned pumpkin and sweetened condensed milk, is silky and spiced with pumpkin pie seasoning. Each slice offers a crisp cocoa edge with a custardy center that holds its shape yet gives way easily with a fork — a texture that always draws compliments. I love serving it with a dollop of lightly sweetened whipped cream and a sprinkle of extra cocoa for contrast.
Why You'll Love This Recipe
- Ready with minimal fuss: the crust comes together in one bowl and the filling takes minutes to whisk, so you can have the tart in the oven in about 20 minutes.
- Uses pantry-stable ingredients: canned pumpkin and sweetened condensed milk mean you don’t need fresh custard components or long shopping lists.
- Great for gatherings: makes a showstopping centerpiece dessert that slices cleanly, perfect for dinner parties or holiday spreads.
- Make-ahead friendly: it sets as it cools and keeps well refrigerated for a couple of days, making it ideal for planning ahead.
- Balanced flavors: unsweetened dark cocoa in the crust tempers the sweetness of the filling for a sophisticated taste adults love but kids still enjoy.
- Minimal equipment: no food processor required — just a bowl, spoon, and a 9-inch tart pan with a removable bottom.
My family’s reaction the first time I brought this out was immediate — forks down, murmurs of approval, and a request for the recipe by name. It’s one of those dishes that feels upscale but is astonishingly easy to produce, and it’s become a reliable favorite for guests and quick celebrations alike.
Ingredients
- For the chocolate crust: 1 cup all-purpose flour, choose an unbleached brand for a clean flavor; 1/2 cup unsweetened dark cocoa powder (use Dutch-process for deeper chocolate notes), 3/4 cup white granulated sugar, 1/2 teaspoon kosher salt, and 1/2 cup (1 stick) unsalted butter, melted. The butter should be warm but not hot so it hydrates the dry ingredients evenly.
- For the pumpkin filling: 1 can (15 oz) pure pumpkin (not pumpkin pie filling — check the label for 100% pumpkin), 1 can (14 oz) sweetened condensed milk (brands like Eagle Brand give consistent results), 1 large egg at room temperature, 1 teaspoon pumpkin pie spice (or 3/4 tsp cinnamon + 1/4 tsp ginger + pinch of cloves), and 1/4 teaspoon kosher salt to amplify the pumpkin’s sweetness.
- Shopping tip: measure by level cups for the flour and sugar; spoon the flour into the cup rather than scooping directly to avoid a dense crust. If you prefer a slightly less sweet crust, reduce sugar to 2/3 cup.
Instructions
Prepare the oven and pan: Preheat to 425°F. Lightly spray a 9-inch tart pan with a removable bottom with non-stick spray or butter the sides, then set aside. Using a removable-bottom pan makes release easy and protects the tart’s edges when serving. Make the chocolate base: In a large bowl, whisk together 1 cup all-purpose flour, 1/2 cup unsweetened dark cocoa powder, 3/4 cup sugar, and 1/2 teaspoon kosher salt until uniform. Make a well in the center, pour in 1/2 cup melted unsalted butter, and stir until the mixture forms coarse crumbs. Use your hands for the final mix to ensure all dry pockets are moistened; press evenly into the bottom and up the sides of the tart pan to a consistent thickness (about 1/8–1/4 inch). Bake the shell: Place the filled tart pan on a baking sheet and bake at 425°F for 10 minutes. You may see small bubbles — this is normal. Remove and let the shell cool about 10 minutes while you prepare the filling; this prevents the shell from shrinking when the filling is added. Whisk the filling: In a clean bowl, combine 1 can (15 oz) pure pumpkin, 1 can (14 oz) sweetened condensed milk, 1 large egg, 1 teaspoon pumpkin pie spice, and 1/4 teaspoon kosher salt. Whisk until completely smooth and glossy — about 30–45 seconds. Room-temperature egg blends more uniformly and reduces the chance of the filling curdling. Fill and bake: Pour the filling into the slightly cooled chocolate crust. Bake at 425°F for 10 minutes, then reduce the oven to 350°F and bake another 25–30 minutes until the center is just set; a toothpick should come out clean or with a few moist crumbs. Avoid overbaking — the tart will continue to set as it cools. Cool and unmold: Allow the tart to cool in the pan for at least 1 hour. Run a thin knife around the edge before removing the removable bottom to prevent sticking. Chill for another hour if you prefer a firmer slice; serve with whipped cream or a dusting of cocoa.
You Must Know
- Storage: refrigerate leftover tart in an airtight container for up to 3 days; it holds texture nicely. Freeze uncut slices wrapped tightly for up to 2 months, thaw overnight in the fridge.
- Nutrition: a typical serving (1 of 8) is moderately rich — plan for an indulgent dessert portion rather than a light snack.
- Baking cues: the edges may set before the center — rely on the toothpick test rather than color alone. Slight jiggle in the very center is fine.
- Make-ahead: you can prepare and bake the crust a day ahead, then add the filling and bake the day you plan to serve for maximum convenience.
One of my favorite things about this tart is how reliably it pleases a crowd. I once took it to a friend’s cozy dinner party and people went back for seconds — not something I expect for most custard desserts. The chocolate crust gives an adult edge that balances the sweet and spiced pumpkin filling, and guests frequently ask for the recipe to recreate it at home.
Storage Tips
Store the tart in the refrigerator, loosely covered with plastic wrap for up to 3 days to preserve the filling’s custardy texture. If you plan to freeze, slice into individual portions, wrap each slice double in plastic wrap, then place in a freezer-safe container for up to 2 months. Reheat frozen slices gently in a 300°F oven for 8–10 minutes or thaw overnight in the fridge and serve chilled. For best texture when refrigerating, wait until the tart reaches room temperature before covering so condensation doesn’t make the crust soggy.
Ingredient Substitutions
If you need to adjust ingredients, you can swap the unsalted butter for an equal amount of melted coconut oil for a dairy-lite edge, though the flavor will be slightly different. For a gluten-free version, replace the flour with a 1-to-1 gluten-free baking blend; note that the crust may be more delicate and benefit from an extra tablespoon of melted butter to bind it. If you prefer less sweetness, reduce the sugar in the crust to 2/3 cup and use half a can (7 oz) of sweetened condensed milk mixed with 1/4 cup evaporated milk for a less-sweet filling.
Serving Suggestions
Serve slices at room temperature or chilled with a dollop of softly whipped cream and a light dusting of cocoa or shaved dark chocolate. For a brunch twist, add a spoonful of orange marmalade on the side to provide citrus brightness. Pair with black coffee or a lightly spiced chai for a cozy contrast; for an adult pairing, a tawny port complements the dark cocoa notes beautifully.
Cultural Background
This tart combines two culinary traditions: the European-style press-in cocoa crust often used in contemporary patisserie and the American love of pumpkin-spice custards. Pumpkin-based desserts have deep roots in autumnal American cooking, while dark cocoa adds a modern patisserie influence — together they create a cross-cultural treat that feels familiar and refined at once.
Seasonal Adaptations
In winter, add a pinch of cardamom to the filling for warming aromatics. For a spring or summer adaptation, swap the pumpkin for sweet potato purée and reduce the spice slightly, or transform it into a tart topped with lightly caramelized pear slices for a fresher profile. Holiday versions can include a brown-butter crust or a crisp pecan streusel sprinkled on top for crunch.
Meal Prep Tips
Prepare the crust up to a day ahead and keep it wrapped in the pan at room temperature; this saves active time the day you plan to bake. The filling mixes in minutes and bakes quickly, so with the crust ready you can have dessert on the table in under an hour. Store slices in shallow airtight containers for quick grab-and-go dessert portions throughout the week.
Final thought: this tart is proof that a few pantry staples, a reliable oven, and attention to simple techniques can produce something memorable. I hope it becomes as dependable in your kitchen as it is in mine — one slice is rarely enough.
Pro Tips
Press the crust evenly into the pan to ensure uniform bake and prevent thin spots that burn.
Let the tart cool at least one hour before removing from the pan so the filling finishes setting.
Check the center with a toothpick a few minutes before the minimum baking time to prevent overbaking.
This nourishing simple dark chocolate pumpkin tart recipe is sure to be a staple in your kitchen. Enjoy every moist, high protein slice — it is perfect for breakfast or as a wholesome snack any time.
FAQs about Recipes
How long does the tart last?
Yes — the tart keeps well in the refrigerator for up to 3 days in an airtight container. For longer storage, freeze individual slices for up to 2 months.
Do I need to bring the egg to room temperature?
Room-temperature egg helps the filling combine smoothly; if your egg is cold, place it in warm water for 5 minutes before using.
Tags
Simple Dark Chocolate Pumpkin Tart
This Simple Dark Chocolate Pumpkin Tart recipe makes perfectly juicy, tender, and flavorful steak every time! Serve with potatoes and a side salad for an unforgettable dinner in under 30 minutes.
Ingredients
Chocolate crust
Pumpkin filling
Instructions
Preheat and prepare pan
Preheat the oven to 425°F. Lightly spray a 9-inch tart pan with removable bottom with non-stick spray and set aside.
Make the crust
Whisk together flour, cocoa powder, sugar, and salt in a large bowl. Make a well, add melted butter, and stir until a crumbly dough forms. Press evenly into the tart pan bottom and up the sides.
Bake the shell
Place the tart pan on a baking sheet and bake at 425°F for 10 minutes. Remove and cool for 10 minutes while preparing the filling.
Prepare the filling
Whisk canned pumpkin, sweetened condensed milk, room-temperature egg, pumpkin pie spice, and salt until smooth and combined.
Fill and finish baking
Pour the filling into the cooled crust. Bake at 425°F for 10 minutes, then reduce oven to 350°F and bake 25–30 minutes until set. Cool in pan at least 1 hour before serving.
Last Step: Please leave a rating and comment letting us know how you liked this recipe! This helps our business to thrive and continue providing free, high-quality recipes for you.
Nutrition
Did You Make This?
Leave a comment & rating below or tag
@snapyrecipe on social media!
Categories:
You might also like...

5-Minute Thanksgiving Appetizers That Wow Every Guest
A fast, elegant bite for Thanksgiving: creamy cheese, bright cranberry, crunchy pecans and rosemary on crackers or baguette — ready in five minutes and loved by all.

Air Fryer Bang Bang Chicken Skewers
Crispy air-fried chicken skewers tossed in a creamy, sweet-spicy bang bang sauce — a quick, crowd-pleasing weeknight favorite.

Air Fryer Honey Butter Garlic Chicken Tenders
Crispy air-fried chicken tenders coated in a sticky honey-butter garlic glaze — quick, family-friendly, and ready in about 25 minutes.
Did You Make This?
Leave a comment & rating below or tag @snapyrecipe on social media!
Rate This Recipe
Share This Recipe
Enjoyed this recipe? Share it with friends and family, and don't forget to leave a review!
Comments (1)
This recipe looks amazing! Can't wait to try it.
Comments are stored locally in your browser. Server comments are displayed alongside your local comments.
Hi, I'm Natalia!
What's Popular

Get My 30-Minute Meals email series!
Quick and easy dinner ideas delivered to your inbox.