
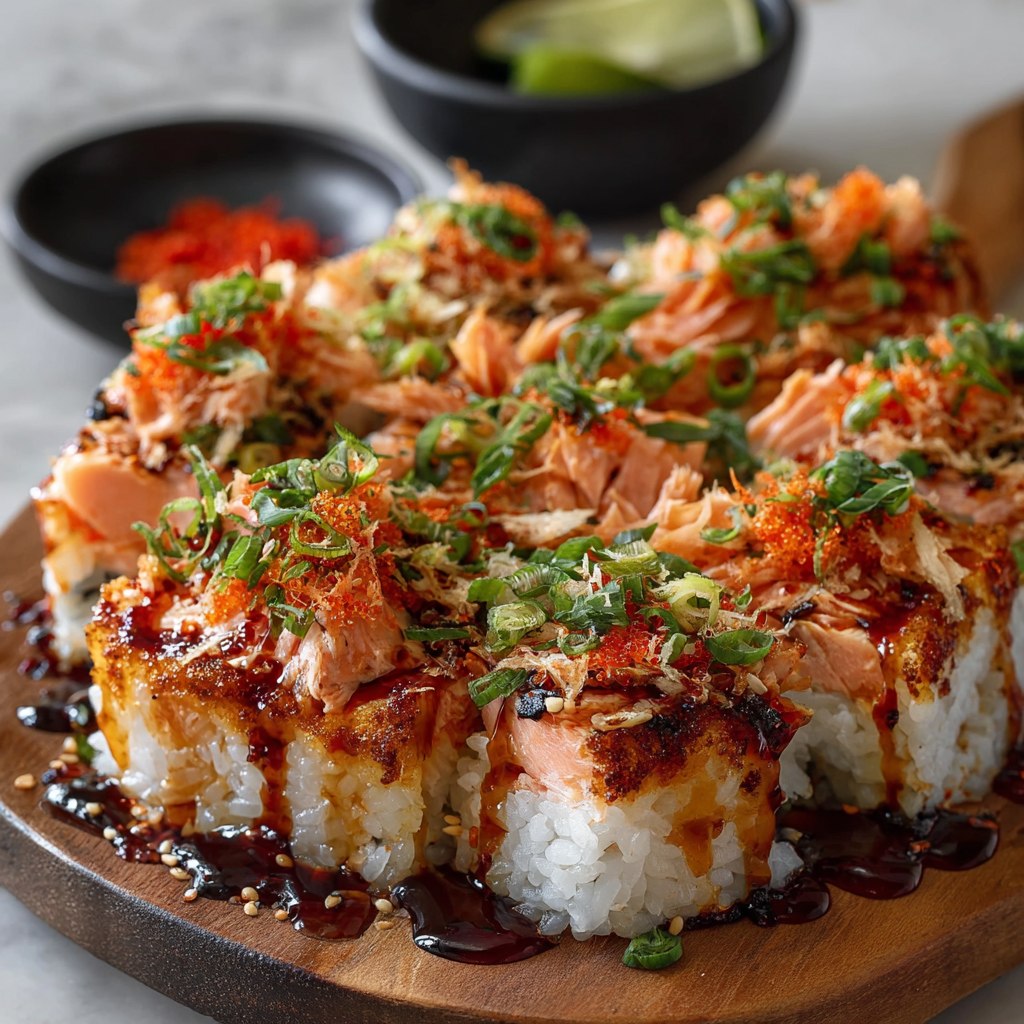
Spicy Salmon Sushi Bake

A comforting, hands-off spicy salmon bake layered over seasoned sushi rice—easy to make, full of umami and crowd-pleasing heat.

This spicy salmon sushi bake has become one of my go-to dishes for casual dinner parties and lazy weekend meals. I discovered this layered, spoonable version of sushi during a weeknight experiment when I wanted sushi flavors without rolling. The result felt like all the best parts of spicy salmon rolls—creamy heat, sesame aroma, briny nori—presented in a simple baking dish. It’s the kind of recipe that fills the kitchen with a heady, savory scent and invites everyone to dig in family-style.
I remember the first time I served it: cousins piled around the counter with rice on their plates and laughter spilling over as they tried to scoop tidy portions. The texture is a joyful contrast—soft, seasoned sushi rice underneath and a creamy, spicy salmon layer on top that browns slightly at the edges when baked. It’s approachable for cooks of any level and scales nicely for a crowd, which is why it’s earned a permanent spot in my rotation at potlucks and busy weeknights alike.
Why You'll Love This Recipe
- Delivers the familiar sushi flavors—vinegar-seasoned rice, fatty salmon, and a spicy mayo—without the skill or time needed for roll-making.
- Hands-off finish: once layered, it bakes for about 25–30 minutes while you prepare sides or set the table, so it’s great for multitasking.
- Uses pantry staples like rice vinegar and mayonnaise plus easy-to-find fresh salmon; you can make it with store-bought mayo and sriracha for speed.
- Make-ahead friendly: you can cook the rice and mix the salmon topping up to a day ahead—assemble and bake when guests arrive (ready in roughly 30 minutes).
- Customizable heat: start with 1–2 tablespoons Sriracha and adjust to taste; it’s easy to temper with extra mayo or amp up with more hot sauce.
On a personal note, my partner declared this the “perfect compromise” between takeout rolls and a home-cooked dinner—satisfying, shareable, and quick. My youngest even likes the rice layer plain, coming back for more once the spicy salmon is on the table.
Ingredients
- Sushi rice (2 cups uncooked): Choose a short-grain Japanese rice for the best sticky texture. Look for brands labeled sushi or short-grain; rinsing until the water runs clear removes excess starch and prevents gummy rice.
- Water (2 1/2 cups): Use for cooking rice—measure precisely for consistent texture. A heavy-bottomed pot or rice cooker yields the most reliable results.
- Rice vinegar (1/4 cup), sugar (2 tablespoons), and salt (1 teaspoon): The classic seasoning trio that gives the rice its bright, slightly sweet sushi profile. Use a mild rice vinegar rather than seasoned varieties if you want to control the sugar and salt yourself.
- Fresh salmon (1 lb, skinless and diced): Buy sushi-grade if you plan to serve any pieces undercooked, but this bake cooks through. Skinless fillets cut into 1/2-inch pieces make mixing and baking even.
- Mayonnaise (1/2 cup): Japanese-style mayo (Kewpie) adds a richer, slightly tangier finish, but any full-fat mayo works. It’s the binding and creamy element that creates the luscious topping.
- Sriracha (2 tablespoons or to taste): Provides the spicy kick—adjust to preference. You can substitute another chili sauce, but flavor balance will change.
- Sesame oil (1 teaspoon): A little goes a long way—adds a toasty, nutty depth that pairs beautifully with the salmon and rice.
- Green onions (1/2 cup, chopped): Mild oniony bite and color; reserve extra for garnish. Slice thin on a sharp knife for the best texture.
- Nori strips (1 sheet, cut): Toasted seaweed strips add crunch and a briny finish—cut into thin ribbons and scatter on top right before serving.
- Tobiko (optional): Fish roe for briny pop and vivid color—use sparingly as a garnish if you like textural contrast.
Instructions
Step 1 — Preheat and Prepare: Preheat the oven to 375°F (190°C). While the oven warms, rinse 2 cups uncooked sushi rice under cold water until the runoff is mostly clear—this removes excess surface starch. Combine the rinsed rice with 2 1/2 cups water in a rice cooker or heavy pot and cook according to your appliance’s instructions—typically 15–20 minutes on a rice cooker setting or bringing to a simmer then covering and reducing heat for stovetop cooking. Step 2 — Season the Rice: In a small bowl, stir together 1/4 cup rice vinegar, 2 tablespoons sugar, and 1 teaspoon salt until dissolved. When the rice is cooked and still hot, transfer it to a wide bowl, gently fluff with a rice paddle or fork, and fold in the vinegar mixture evenly. Spread the seasoned rice into the bottom of a 9x13-inch baking dish in an even layer and allow it to cool slightly so the topping won’t melt immediately when added. Step 3 — Mix the Topping: In a medium bowl combine 1 lb diced salmon, 1/2 cup mayonnaise, 2 tablespoons Sriracha (adjust for heat preference), 1 teaspoon sesame oil, and 1/2 cup chopped green onions. Use a flexible spatula to fold until everything is evenly coated. Taste a small pinch of the mixture and adjust seasoning—more Sriracha for heat, more mayo to mellow it, or a pinch of salt if needed. Step 4 — Assemble: Spread the salmon mixture evenly over the cooled rice layer, pressing gently to form a uniform top. Smooth the surface so it will brown consistently in the oven. If using tobiko, dot some on the surface lightly—remember it will add saltiness and briny pops after baking. Step 5 — Bake: Bake in the preheated oven for 25–30 minutes until the salmon is cooked through and the top is beginning to brown at the edges. Internal temperature should reach at least 145°F (63°C) for fully cooked fish. If you like a slightly charred top, finish with a 1–2 minute broil—watch closely to prevent burning. Step 6 — Garnish and Serve: Remove from the oven and let cool for 5 minutes. Garnish with extra chopped green onions, nori strips, and additional tobiko if desired. Serve warm: scoop portions onto small plates, or set out spoons and let guests serve themselves. Provide soy sauce or tamari, pickled ginger, and wasabi on the side for a takeout-like experience.
You Must Know
- This dish is high in protein thanks to the salmon and makes for a satisfying main; it freezes well for up to 3 months if tightly wrapped.
- Store leftovers in an airtight container in the refrigerator for up to 3 days; reheat gently in a 350°F (175°C) oven to preserve texture.
- Because mayonnaise and salmon supply most of the fat, the bake is relatively energy-dense—serve with a crisp salad to balance the meal.
- Substitute low-sodium soy sauce or tamari when serving if you’re watching sodium intake; adjust the topping seasoning accordingly.
My favorite thing about this dish is how it bridges comfort and novelty—people expect sushi flavors but love the simplicity of spooning it onto plates. At family gatherings it’s always the first pan to empty; the crunchy nori and bright green onion garnish make it feel celebratory even though it’s so simple to pull together.
Storage Tips
Let the leftover portions cool to room temperature (no more than two hours at room temp) before refrigerating in shallow, airtight containers. Refrigerated portions will be best within 2–3 days. For freezing, transfer cooled portions into freezer-safe containers and press a layer of plastic wrap directly onto the surface to limit ice crystals; label and freeze for up to 3 months. To reheat, thaw overnight in the fridge if frozen, then warm in a 350°F (175°C) oven for 12–15 minutes until heated through; avoid microwave reheating if possible, as it can make the rice gummy and the topping watery.
Ingredient Substitutions
If fresh salmon is unavailable, substitute cooked canned salmon (drained and flaked) but reduce mayo slightly to avoid excess moisture; texture will be different but still tasty. For a budget-friendly swap, use cooked shrimp or imitation crab mixed with the spicy mayo. To make this dairy-free, standard mayonnaise is already dairy-free—choose an egg-free vegan mayo and the dish remains dairy-free but not vegan. For a gluten-free label, confirm your Sriracha and soy sauce are certified gluten-free or use tamari.
Serving Suggestions
Serve with crisp cucumber salad, pickled ginger, and a drizzle of soy sauce or ponzu. For a casual party, provide rice crackers or scooping spoons so guests can make handheld bites. Garnish with toasted sesame seeds and thinly sliced avocado for richness. This dish also pairs nicely with a light miso soup or a citrusy green salad to cut through the richness of the mayo-topped salmon.
Cultural Background
This casserole-style adaptation draws inspiration from Japanese spicy salmon rolls and contemporary American sushi trends. The idea of layering sushi flavors into a bake is a modern, Westernized take—popularized in home kitchens and casual restaurants as a way to enjoy sushi-style ingredients without the technique of rolling. It reflects the fusion of sushi’s flavor profile with convenience-driven comfort food culture.
Seasonal Adaptations
In spring and summer, fold in diced cucumber or edamame into the rice layer for freshness. In fall and winter, top with a quick roasted shiitake and scallion mix for earthiness. Swap Sriracha for a chili-garlic paste in the winter for a smokier heat, and add a splash of yuzu or lemon to the mayo mixture in the warmer months for brightness.
Meal Prep Tips
Cook the rice and refrigerate; make the salmon-mayo mixture separately and keep chilled. On the day you plan to serve, assemble into the dish and bake for 25–30 minutes—this saves active evening time to prepare sides. Portion into individual ramekins before baking if you want single-serve reheating and presentation. Use airtight, stackable containers for efficient fridge storage of components.
This spicy salmon sushi bake combines approachable technique with bold flavors—the kind of dish you’ll return to when you want something impressive but not fussy. It’s forgiving, adaptable, and always a hit at the table. Try it once, tweak the heat and garnishes to your taste, and make it your own.
Pro Tips
Rinse the sushi rice until the water runs mostly clear to prevent a gummy texture when cooked.
Cool the seasoned rice slightly before adding the topping so the mayonnaise doesn't melt away on contact.
If you want a slightly charred finish, switch to broil for the last 1–2 minutes—watch closely to avoid burning.
This nourishing spicy salmon sushi bake recipe is sure to be a staple in your kitchen. Enjoy every moist, high protein slice — it is perfect for breakfast or as a wholesome snack any time.
Tags
Spicy Salmon Sushi Bake
This Spicy Salmon Sushi Bake recipe makes perfectly juicy, tender, and flavorful steak every time! Serve with potatoes and a side salad for an unforgettable dinner in under 30 minutes.
Ingredients
Rice
Topping
Garnish
Instructions
Preheat and rinse rice
Preheat oven to 375°F (190°C). Rinse 2 cups sushi rice under cold water until runoff is mostly clear, then combine with 2 1/2 cups water in a rice cooker or pot and cook until tender.
Season the rice
Stir together 1/4 cup rice vinegar, 2 tablespoons sugar, and 1 teaspoon salt until dissolved. Fold into hot cooked rice, fluff gently, and spread evenly in a 9x13-inch baking dish. Let cool slightly.
Prepare the salmon topping
In a bowl, combine 1 lb diced salmon, 1/2 cup mayonnaise, 2 tablespoons Sriracha, 1 teaspoon sesame oil, and 1/2 cup chopped green onions. Mix until well coated and adjust seasoning.
Assemble the layers
Spread the salmon mixture evenly over the rice layer, smoothing the top so it bakes evenly. Add a few dots of tobiko if using.
Bake until cooked
Bake for 25–30 minutes until salmon is cooked through and the top begins to brown. For a charred finish, broil 1–2 minutes while watching closely.
Garnish and serve
Let cool for 5 minutes, then garnish with extra green onions, nori strips, and tobiko. Serve warm, scooping portions with a spoon.
Last Step: Please leave a rating and comment letting us know how you liked this recipe! This helps our business to thrive and continue providing free, high-quality recipes for you.
Nutrition
Did You Make This?
Leave a comment & rating below or tag
@snapyrecipe on social media!
Categories:
You might also like...

5-Minute Thanksgiving Appetizers That Wow Every Guest
A fast, elegant bite for Thanksgiving: creamy cheese, bright cranberry, crunchy pecans and rosemary on crackers or baguette — ready in five minutes and loved by all.

Air Fryer Bang Bang Chicken Skewers
Crispy air-fried chicken skewers tossed in a creamy, sweet-spicy bang bang sauce — a quick, crowd-pleasing weeknight favorite.

Air Fryer Honey Butter Garlic Chicken Tenders
Crispy air-fried chicken tenders coated in a sticky honey-butter garlic glaze — quick, family-friendly, and ready in about 25 minutes.
Did You Make This?
Leave a comment & rating below or tag @snapyrecipe on social media!
Rate This Recipe
Share This Recipe
Enjoyed this recipe? Share it with friends and family, and don't forget to leave a review!
Comments (1)
This recipe looks amazing! Can't wait to try it.
Comments are stored locally in your browser. Server comments are displayed alongside your local comments.
Hi, I'm Natalia!
What's Popular

Get My 30-Minute Meals email series!
Quick and easy dinner ideas delivered to your inbox.